使用Symmetric Key认证设备接入Azure IoT Hub
分类: Azure物联网 ◆ 标签: #Azure #IoT Hub # #入门 #指南 ◆ 发布于: 2023-06-13 21:54:15

我们之前已经介绍了什么是Azure IoT Hub以及Azure IoT Hub提供的工具,也浏览了如何使用Azure Portal对Azure IoT Hub相关的资源进行管理,从本篇开始我们会正式进入物联网应用的开发。
物联网的开发从设备接入开始,Azure IoT Hub提供如下三种设备认证方式:
- 基于
Symmetric key认证 - 基于自签发的
X509证书进行认证 - 基于
X509证书进行认证
同时支持如下的通讯协议:
MQTT以及MQTT on WebsocketAMQP以及AMQP on WebScoketHTTPS
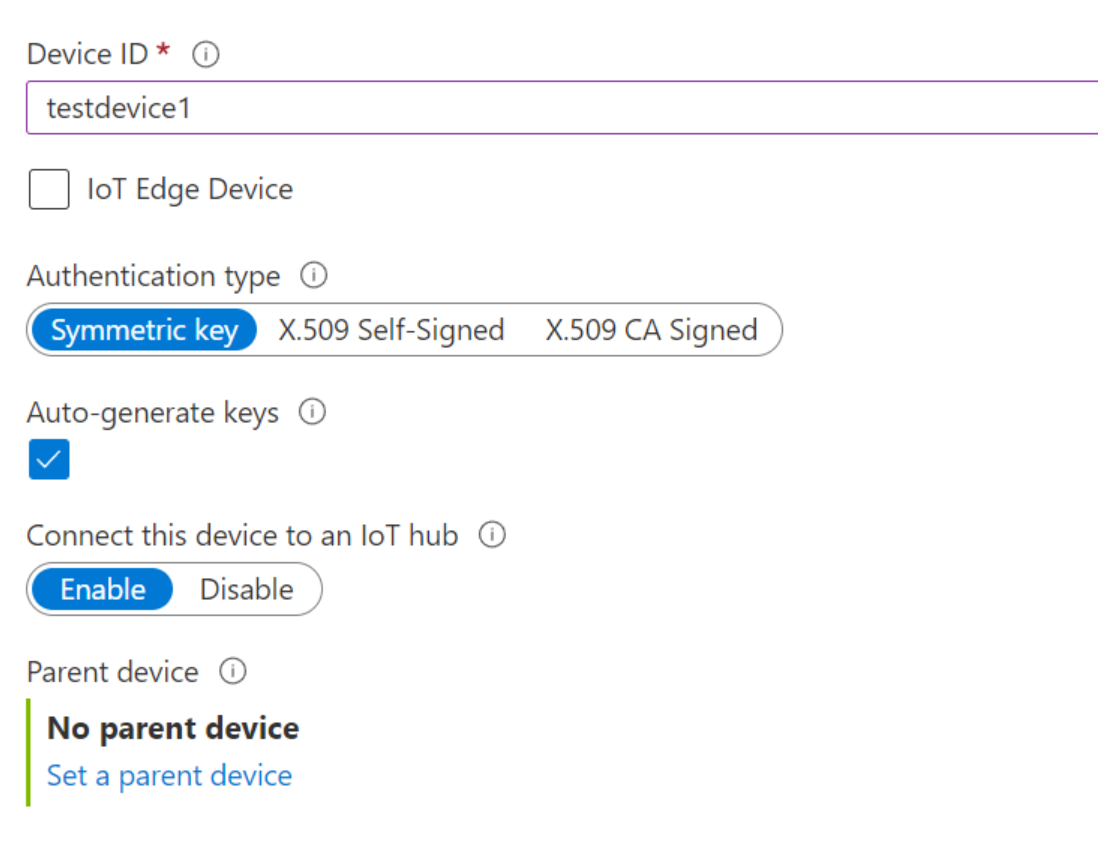
要开始本章及后继章节的学习,您需要:
- 一个
Azure账号 - 使用
Azure Portal创建好一个Azure IoT Hub - 使用
Azure Portal创建一个设备
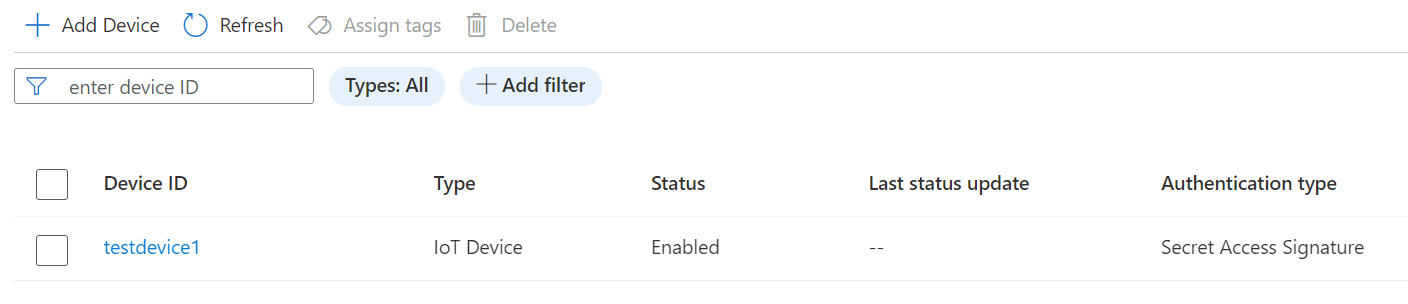
如果您已经创建好了以上的资源,设备名为testdevice1, 然后可以通过Azure Portal -> Device Management -> Device 在设备列表里找到你创建的设备,并找到该设备的连接字符串,如下图:
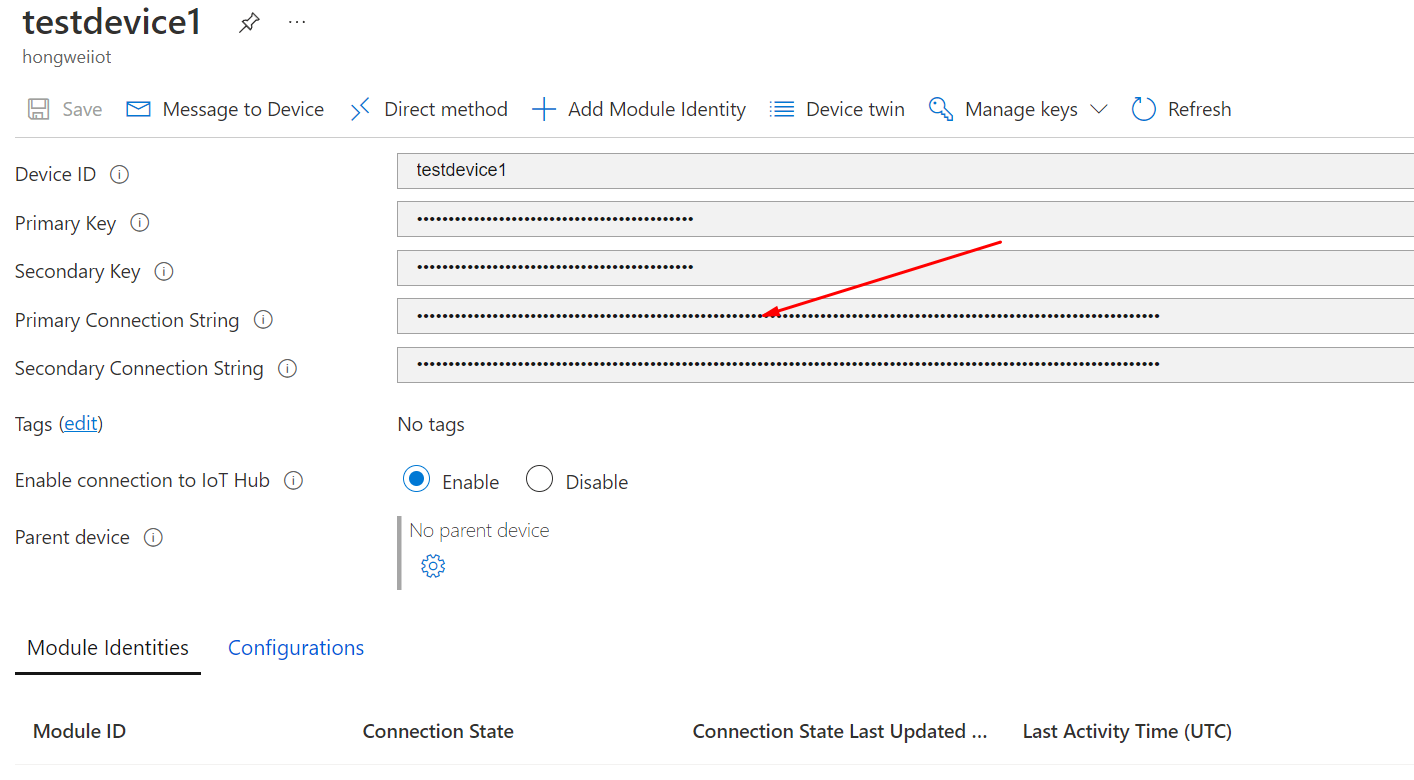
从上图拿到该设备的Primary Connection String之后,保存该字符串,接下来我们创建的应用需要使用到该字符串。
使用Device SDK创建连接Azure IoT Hub的应用
注意
本章实例代码可以从:https://github.com/hylinux/azure-iot-hub-examples/tree/main/DevicesBySASKey 下载。
这个系列里都使用基于.Net的SDK,如果你使用其他的语言,请参考其他语言的SDK说明,该系列所有的理论适用于所有语言的SDK。
使用如下的命令创建一个控制台应用:
dotnet new console -o DevicesBySASKey
cd DevicesBySASKey
添加必要的辅助包:
dotnet add package Microsoft.Extensions.Hosting
添加该包是为了给控制台应用添加配置管理和Host, 为了安全起见,为了我们在开发过程中不引发安全事故,我们使用.Net的工具Secret Manager来管理我们的机密字符串,例如设备的连接字符串,数据库的连接字符串和密码,需要注意的是Secret Manager只能应用于开发中,如果需要部署到产线,请利用环境变量或者Azure Key Valut来管理和存储机密信息。
使用Secret Manager工具存储我们刚刚从Azure Portal上拿到的设备连接字符串。
请在项目的目录下运行:
dotnet user-secrets init
dotnet user-secrets set "Device:ConnectString" "<你的设备连接字符串>"
使用Visual Studio Code打开项目目录,编辑文件Program.cs,先使用如下的代码搭建程序的框架:
using Microsoft.Extensions.Hosting;

using IHost host = Host.CreateDefaultBuilder(args).Build();

await host.RunAsync();
退回到项目目录,添加Azure IoT Hub的设备SDK:
dotnet add package Microsoft.Azure.Devices.Client
继续使用VS Code编辑文件Program.cs,从Security Manager中取得设备连接字符串,并创建DeviceClient的实例,连接Azure IoT Hub。
using Microsoft.Extensions.Hosting;
using Microsoft.Extensions.Configuration;
using Microsoft.Extensions.DependencyInjection;
using Microsoft.Azure.Devices.Client;

using IHost host = Host.CreateDefaultBuilder(args).Build();

var ConnectionString = host.Services.GetRequiredService<IConfiguration>().GetValue<string>("Device:ConnectString");

var deviceClient = DeviceClient.CreateFromConnectionString(ConnectionString);
Console.WriteLine("设备连接正常。");


await host.RunAsync();
然后我们尝试在命令行下使用.Net Cli运行代码:
如果您是使用的Powershell:
$env:DOTNET_ENVIRONMENT = "Development"
dotnet run
如果您是使用的CMD:
set DOTNET_ENVIRONMENT=Development
dotnet run
如果您是直接使用的是VS Code, 那么打开VS Code项目目录下的:.vscode\launch.json, 添加如下的环境变量:
    "version": "0.2.0",
    "configurations": [
        {
            // Use IntelliSense to find out which attributes exist for C# debugging
            // Use hover for the description of the existing attributes
            // For further information visit https://github.com/OmniSharp/omnisharp-vscode/blob/master/debugger-launchjson.md
            "name": ".NET Core Launch (console)",
            "type": "coreclr",
            "request": "launch",
            "preLaunchTask": "build",
            // If you have changed target frameworks, make sure to update the program path.
            "program": "${workspaceFolder}/bin/Debug/net7.0/DevicesBySASKey.dll",
            "args": [],
            "cwd": "${workspaceFolder}",
            // For more information about the 'console' field, see https://aka.ms/VSCode-CS-LaunchJson-Console
            "console": "internalConsole",
            "stopAtEntry": false,
            "env": {
                "DOTNET_ENVIRONMENT": "Development"
            }
        },
其中的env部分就是我们需要的。
至此我们已经使用Symmetric key使得设备连接到了Azure IoT Hub, 为了证明我们确实是连接上了Azure IoT Hub, 我们在Program.cs底部加上一个方法:
static async Task SendDeviceToCloudMessagesAsync(DeviceClient deviceClient, CancellationToken ct)
{
    double minTemperature = 20;
    double minHumidity = 60;
    var rand = new Random();

    try
    {
        while (!ct.IsCancellationRequested)
        {
            double currentTemperature = minTemperature + rand.NextDouble() * 15;
            double currentHumidity = minHumidity + rand.NextDouble() * 20;

            // Create JSON message
            string messageBody = JsonSerializer.Serialize(
                new
                {
                    temperature = currentTemperature,
                    humidity = currentHumidity,
                });
            using var message = new Message(Encoding.ASCII.GetBytes(messageBody))
            {
                ContentType = "application/json",
                ContentEncoding = "utf-8",
            };

            // Add a custom application property to the message.
            // An IoT hub can filter on these properties without access to the message body.
            message.Properties.Add("temperatureAlert", (currentTemperature > 30) ? "true" : "false");

            // Send the telemetry message
            await deviceClient.SendEventAsync(message, ct);
            Console.WriteLine($"{DateTime.Now} > Sending message: {messageBody}");

            await Task.Delay(1000, ct);
        }
    }
    catch (TaskCanceledException) { } // ct was signaled
}
这个方法是我们有提到的Device-to-Message方法,我们这里不用关心这个方法的具体实现,后面我们还会详细的讨论。这里是为了证明我们的确连接上了Azure IoT Hub。
在代码底部添加方法SendDeviceToCloudMessagesAsync之后,我们需要在文件头引用如下几个程序集:
using System.Text.Json;
using System.Text;
同时在代码行:
Console.WriteLine("设备连接正常。");
后添加如下的代码行:
using var cts = new CancellationTokenSource();
await SendDeviceToCloudMessagesAsync(deviceClient, cts.Token);
添加好了之后,保存文件,并按照上述的方式运行代码:
PS D:\MyProjects\azure-iot-hub-examples\DevicesBySASKey> dotnet run
设备连接正常。
2022/11/26 18:07:55 > Sending message: {"temperature":29.58991467666374,"humidity":67.6211201370918}
2022/11/26 18:07:56 > Sending message: {"temperature":26.645653516926096,"humidity":61.0385052861619}
2022/11/26 18:07:57 > Sending message: {"temperature":20.95398050097023,"humidity":75.85693630480884}
2022/11/26 18:07:58 > Sending message: {"temperature":33.47872102713115,"humidity":79.37191878442661}
2022/11/26 18:07:59 > Sending message: {"temperature":21.193194507649253,"humidity":72.86029097229414}
2022/11/26 18:08:01 > Sending message: {"temperature":32.339067082163936,"humidity":69.28305746915221}
PS D:\MyProjects\azure-iot-hub-examples\DevicesBySASKey>
同时打开Azure Portal观察:
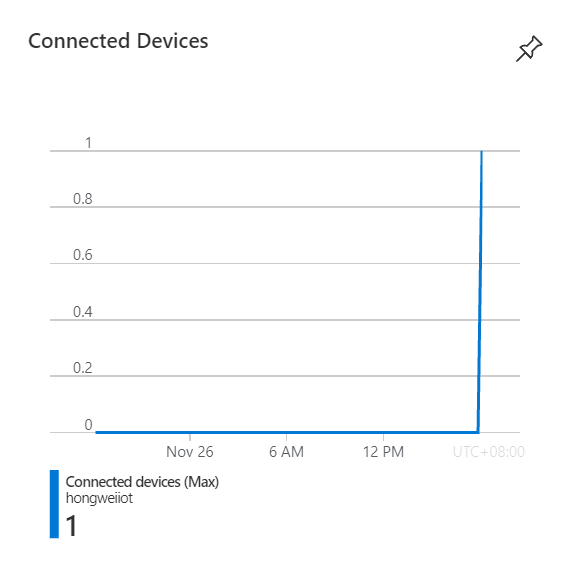
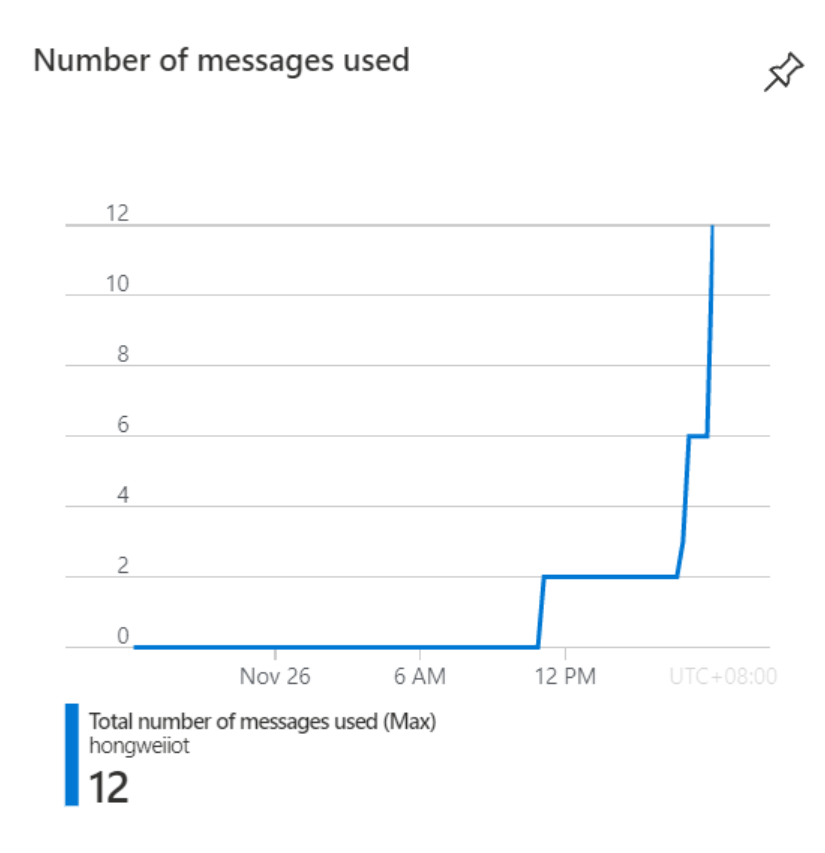
从Portal的统计上可以看到连接的设备数和发送的消息数,这些都证明我们已经连接到了Azure IoT Hub。
注意
Azure Portal上的监控不是实时的呈现的,日志有一定的滞后,如果您没有从Portal看到相关的数据,稍微等一下。
测试用使用的不同的协议连接Azure IoT Hub
我们之前讨论过Azure IoT Hub提供了很多种协议,那么我们来测试一下如何使用不同的协议, 打开文件Program.cs, 编辑代码行:
var deviceClient = DeviceClient.CreateFromConnectionString(ConnectionString);
使用MQTT协议:
var deviceClient = DeviceClient.CreateFromConnectionString(ConnectionString, TransportType.Mqtt);
使用AMQP协议:
var deviceClient = DeviceClient.CreateFromConnectionString(ConnectionString, TransportType.Amqp);
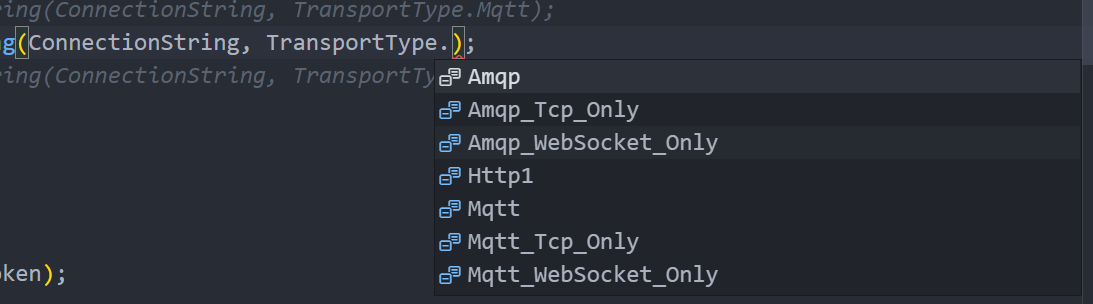
同时从下图可以看到目前支持的所有的协议:
至此我们测试完成了使用Symmetric Key认证设备并连接Azure IoT Hub。