Jupyter for Azure机器学习五天入门 - Day4 使用Jupyter结合Python SDK进行AutoML 回归模型的训练
分类: Azure机器学习 ◆ 标签: #Azure #人工智能 #机器学习 #JupyterBook #Python ◆ 发布于: 2023-06-11 21:54:41

使用jupyter进行机器学习的入门今天这篇已经是第四天了,我们今天来学习一个新的技能点: AutoML, 即: automated Machine Learning, 自动化机器学习,首先需要大致的了解一下什么是AutoML, 当然如果要详细的讲述这个概念还值得我们重新开一个系列来讨论和学习它,在这里我们就简单的了解一下就好了。
我们前面的一些列的教程在机器学习的整个过程基本就是这样几个步骤:
- 处理数据:包括收集数据,对数据进行必要的转换,以及对数据进行清理。
- 选择算法:选择合适的算法,然后编写训练脚本,进行训练。
- 创建环境,然后向Azure提交任务。
- 最后对训练出来的模型进行测试和评估,选择最优的模型出来。
以上就是我们在机器学习是的基本步骤,但是AutoML呢?AutoML主要的工作就帮助用户将上述这些步骤都自动化,用官方的话来讲就是AutoML是一个机器学习的自动处理过程。
针对于Azure, AutoML主要适用于回归模型、分类模型以及预测模型,这三种。如果大家需要详细的了解和学习AutoML的理论,大家也可以找相应的文献来阅读,微软关于AutoML: https://www.microsoft.com/en-us/research/project/automl/
本章是一个快速的教程,帮助大家如果快速的利用Azure的Python SDK来进行AutoML 模型的训练。
准备AutoML的环境
我们前面已经学习过很多准备环境的基础知识,准备AutoML的环境和之前的相似,但是还有一个更快的办法:
- 到github上clone Azure Machine Learning的库:https://github.com/Azure/MachineLearningNotebooks.git
- 进入目录: MachineLearningNotebooks/tree/master/how-to-use-azureml/automated-machine-learning, 找到文件: automl_setup.cmd(for windows), automl_setup_linux.sh(For Linux)
- 启动您的conda 环境,例如: conda activate base
- 运行相应的脚本,完成后,会自动启
jupyter notebook
上述已经为AutoML设定了环境,但是本章的案例还需要其他的包,因此杀掉jupyter之后,在命令行上安装我们需要的包:
pip install azureml-opendatasets azureml-widgets
安装好了之后,重启jupyter: jupyter notebook
开始AutoML 模型训练
今天的实例是要对NYC的出租车价格进行一个预测,我们这里使用的是opendataset中提供的数据,根据我们之前的经验,我们先需要处理数据。
本章的实例可以从如下的URL参考https://github.com/hylinux/azure-demo/blob/main/azure-machine-learning/jupyter-5-days/Day-4.ipynb,也可以从刚刚下载的实例库中找到。
数据处理
由于我们采用的是opendataset, 我们先需要将数据下载回来:
from azureml.opendatasets import NycTlcGreen
import pandas as pd
from datetime import datetime
from dateutil.relativedelta import relativedelta
我们会使用一个dataframe来保存所有的数据,如果在本地没有运行spark的环境下,为了防止内存不够,opendataset会限制一次只能下载一个月的数据,因此我们会定义好一个时间区段,然后每次下载一个月。如下图:
green_taxi_df = pd.DataFrame([])
start = datetime.strptime("1/1/2015","%m/%d/%Y")
end = datetime.strptime("1/31/2015","%m/%d/%Y")

for sample_month in range(12):
    temp_df_green = NycTlcGreen(start + relativedelta(months=sample_month), end + relativedelta(months=sample_month)) \
        .to_pandas_dataframe()
    green_taxi_df = green_taxi_df.append(temp_df_green.sample(2000))

green_taxi_df.head(10)
数据下载完成之后,查看10条数据。
初步将原始数据载入之后,为了更好的训练数据,我们需要将数据分成几个时间粒度,例如:月份,几号,星期几等等。
def build_time_features(vector):
    pickup_datetime = vector[0]
    month_num = pickup_datetime.month
    day_of_month = pickup_datetime.day
    day_of_week = pickup_datetime.weekday()
    hour_of_day = pickup_datetime.hour

    return pd.Series((month_num, day_of_month, day_of_week, hour_of_day))

green_taxi_df[["month_num", "day_of_month","day_of_week", "hour_of_day"]] = green_taxi_df[["lpepPickupDatetime"]].apply(build_time_features, axis=1)
green_taxi_df.head(10)
移除我们不需要的列
columns_to_remove = ["lpepPickupDatetime", "lpepDropoffDatetime", "puLocationId", "doLocationId", "extra", "mtaTax",
                     "improvementSurcharge", "tollsAmount", "ehailFee", "tripType", "rateCodeID",
                     "storeAndFwdFlag", "paymentType", "fareAmount", "tipAmount"
                    ]
for col in columns_to_remove:
    green_taxi_df.pop(col)

green_taxi_df.head(5)
清洗数据
先浏览一下数据,然后清洗掉有问题的数据
green_taxi_df.describe()
final_df = green_taxi_df.query("pickupLatitude>=40.53 and pickupLatitude<=40.88")
final_df = final_df.query("pickupLongitude>=-74.09 and pickupLongitude<=-73.72")
final_df = final_df.query("tripDistance>=0.25 and tripDistance<31")
final_df = final_df.query("passengerCount>0 and totalAmount>0")

columns_to_remove_for_training = ["pickupLongitude", "pickupLatitude", "dropoffLongitude", "dropoffLatitude"]
for col in columns_to_remove_for_training:
    final_df.pop(col)

final_df.describe()
至此我们已经有了符合需求的数据,开始准备环境进行automl的模型训练了。
开始训练模型
还是老规矩,首先准备一些必备的环境,例如链接到workspace, 准备拆分数据,准备experiment等等。
链接到workspace
别忘了Azure Cli的设置以及从Azure Machine Learning下载config.js文件,并放置到项目根目录.
from azureml.core.workspace import Workspace
ws = Workspace.from_config()
拆分数据
将准备好的数据一部分用于训练,一部分用于测试
from sklearn.model_selection import train_test_split

x_train, x_test = train_test_split(final_df, test_size=0.2, random_state=223)
自动训练模型
要训练AutoML的模型,有两个步骤:
- 定义
experiment的配置,传入训练的数据dataframe - 提交
experiment进行模型训练。
定义训练参数
注意
这里有一个非常有意思的地方,我们前面使用Python SDK进行训练的时候,都是会定义一个训练的脚本,但是在AutoML中,我们无需去顶一个一个训练的脚本,而仅仅是只要给出autoML的配置就可以了。Azure AutoML会根据你的设定自动帮你训练模型。
我们这里需要一个automl的配置,关于automl的详细配置列表和说明,你可以参考这里:https://docs.microsoft.com/en-us/azure/machine-learning/how-to-configure-auto-train
import logging

automl_settings = {
    "iteration_timeout_minutes": 10,
    "experiment_timeout_hours": 0.3,
    "enable_early_stopping": True,
    "primary_metric": 'spearman_correlation',
    "featurization": 'auto',
    "verbosity": logging.INFO,
    "n_cross_validations": 5
}
根据配置我们需要生成一个automlconfig的对象,如下:
from azureml.train.automl import AutoMLConfig

automl_config = AutoMLConfig(task='regression',
                             debug_log='automated_ml_errors.log',
                             training_data=x_train,
                             label_column_name="totalAmount",
                             **automl_settings)
请注意task这个参数,由于我们需要的是一个回归模型,因此task的参数值是:regression, 同时我们也讲过了Azure autoML的使用范围就是回归, 分类, 预测
训练模型
我们开始训练模型
from azureml.core.experiment import Experiment
experiment = Experiment(ws, "Tutorial-NYCTaxi")
local_run = experiment.submit(automl_config, show_output=True)
这里可以看到这个动作非常简单,而无需像python sdk一样还需要配置一个ScriptRunConfig这样的对象, 这就是AutoML。
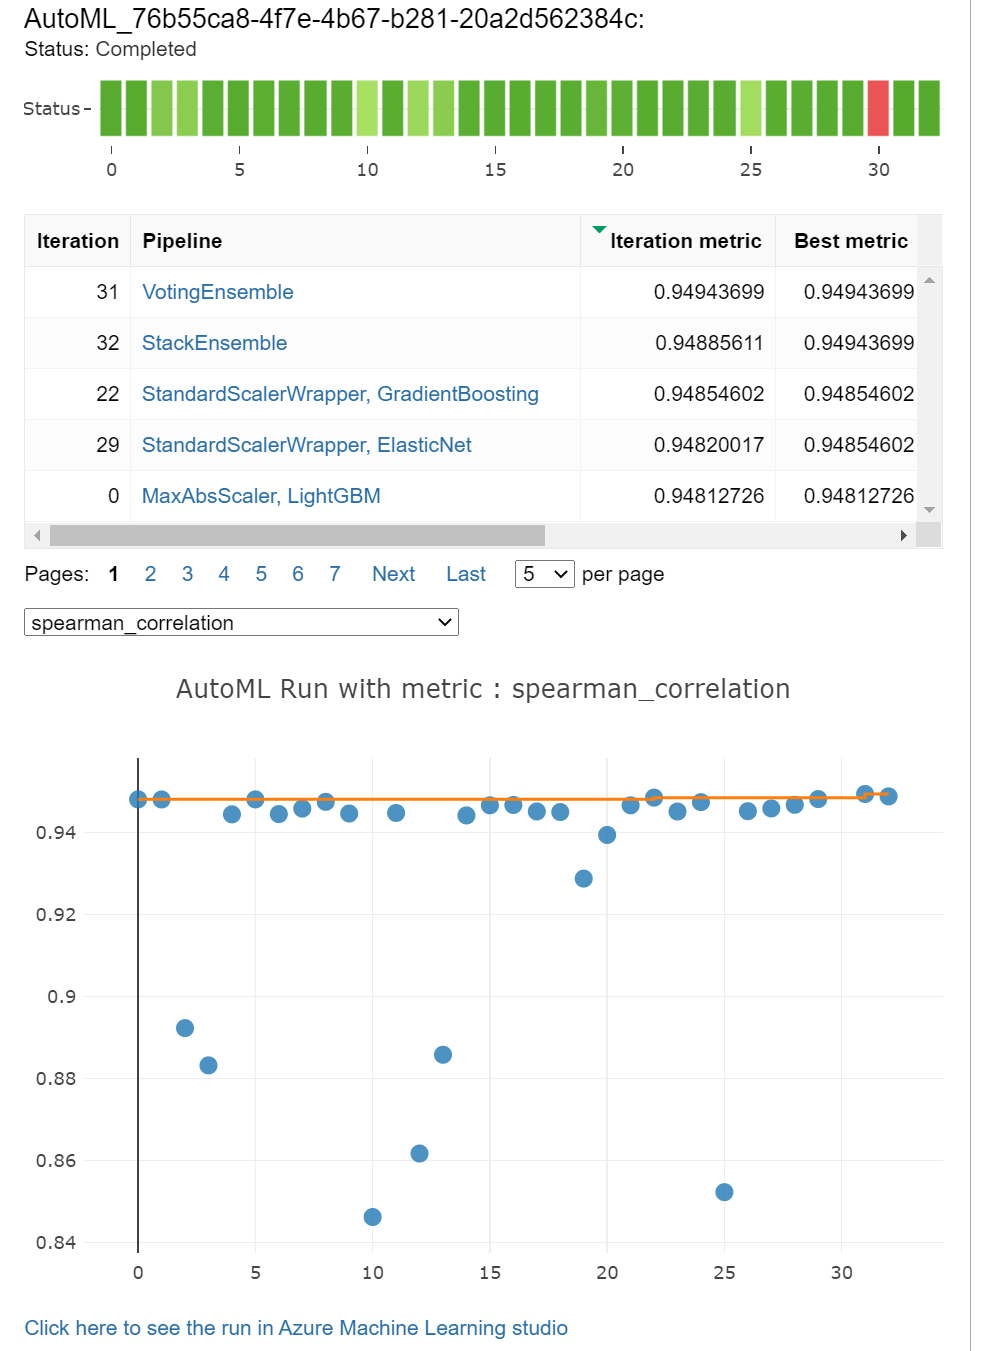
浏览训练的结果
我们这里使用jupyter widget, 用法也很简单
from azureml.widgets import RunDetails
RunDetails(local_run).show()
jupyter真的是一个很强大的工具啊。如下图:
取回最佳模型
模型训练完成之后,我们需要取回最佳模型
best_run, fitted_model = local_run.get_output()
print(best_run)
print(fitted_model)
测试最佳模型
y_test = x_test.pop("totalAmount")

y_predict = fitted_model.predict(x_test)
print(y_predict[:10])
到这里我们就结束了一个简单的使用AutoML来快速的训练模型的实例。