从设备上传文件到云
分类: Azure物联网 ◆ 标签: #Azure #IoT Hub # #指南 #入门 ◆ 发布于: 2023-06-13 23:09:36

我们之前的文章都是介绍如何在设备上向云发送消息,这包括通过发送遥测数据(D2C Message), 或者上报属性的更改等等,但是还有一种场景,我们需要向云发送文件,例如我们在使用视频监控设备进行监控的时候,监控设备会定期生成相同大小的视频文件,这些视频文件是我们的监控数据,视频文件一般会比较大,不适合通过D2C消息上传到云,我们可以使用Azure IoT Hub结合Azure Storage提供的文件上传功能来应对这个场景。
要从设备上向云上传文件,需要如下几个步骤:
- 在
Azure IoT Hub里配置Azure Storage。 - 在设备应用中初始化文件上传的功能
- 利用初始化的结果取回
Azure Storage SAS链接字符串。 - 使用
Azure Storage SDK结合得到的SAS链接字符串完成上传文件。
我们先在Azure IoT Hub中配置Azure Storage
- 创建好
Azure IoT Hub和Azure Storage的资源,最好将这两个资源创建在同一个资源组里,并且在同一个Azure区域。 - 登录
Azure Portal, 找到你的Azure IoT Hub资源,然后从左侧的菜单里选择Hub Settings -> File Upload, 如下图:
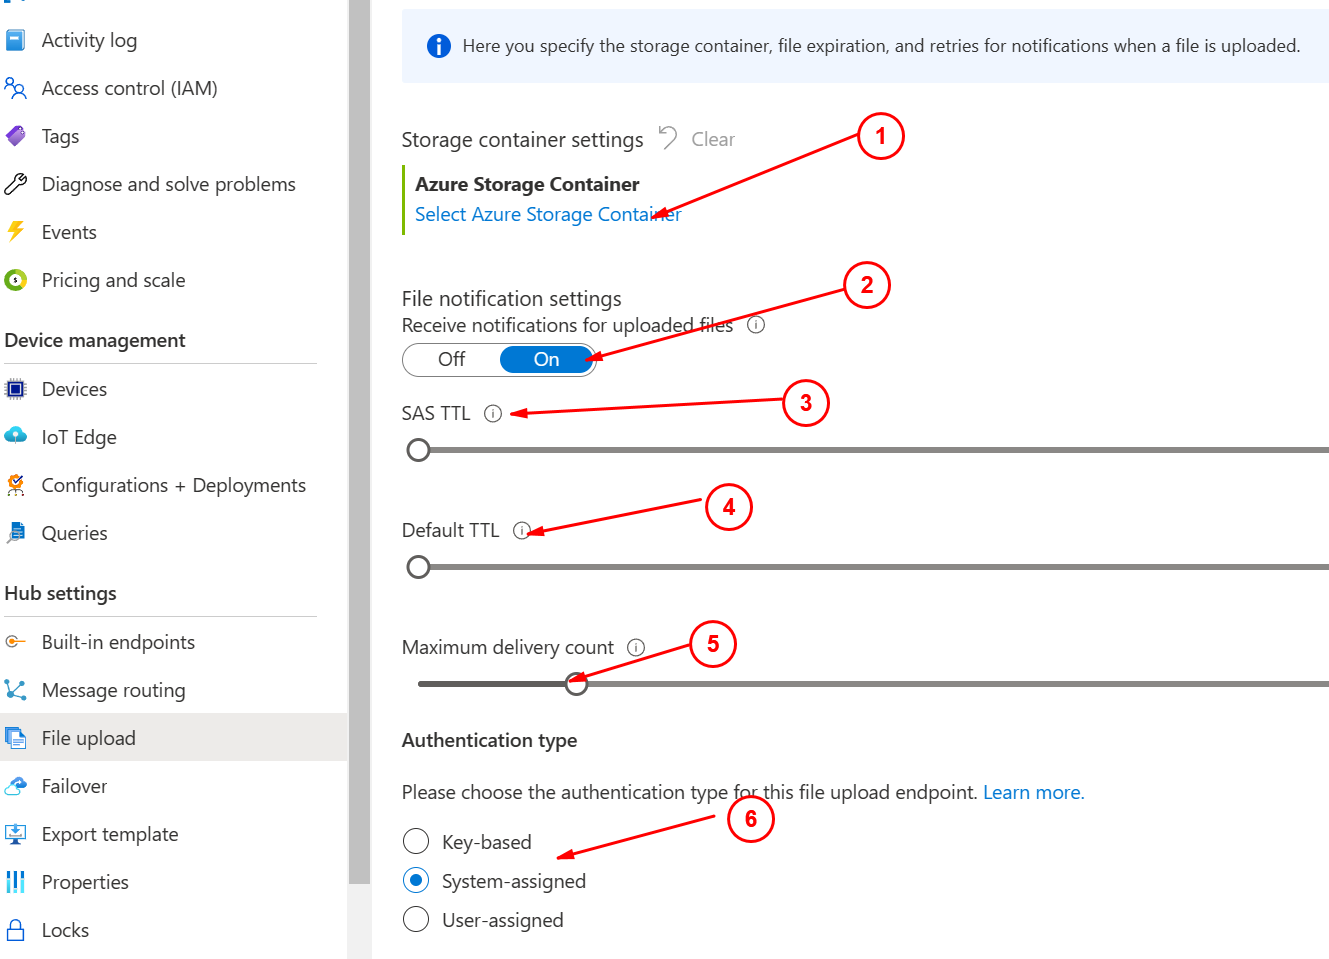
这个界面的配置还是很直接的: - 在
1处选择之前已经准备好的Storage, 并选择好需要放置的容器。 - 在
2处配置文件上传之后是否发送上传成功的通知,后台应用可以监听这个事件,并及时处理上传的文件。 - 在
3处配置当我们初始化上传功能之后,生成的Azure Storage的SAS Key的过期时间,默认是1个小时,取值范围在1 - 24小时。 - 在
4处配置文件上传成功后发送的通知消息过期时间是多少,默认是一个小时,取值范围是1 - 48小时。 - 在
5处配置Azure IoT Hub在同一时间内可以传递多少条文件上传成功的消息,取值范围是1 - 100条。 - 在
6处配置Azure IoT Hub和Azure Stoarge之间的认证方式,默认是通过System-assigned
到这里就配置好了,那么我们接下来可以开始新建两个应用快速的测试一下。
上传文件的设备应用
首先创建一个控制台的应用:
dotnet new console -o DeviceUploadFileDemo
cd .\DeviceUploadFileDemo\
dotnet add package Azure.Storage.Blobs
dotnet add package CommandLineParser
dotnet add package Microsoft.Azure.Devices.Client
code .
注意
code .是使用Visual Studio Code打开当前的项目目录,另外需要注意的是,本章的代码可以在这个URL找到:https://github.com/hylinux/azure-iot-hub-examples/tree/main/DeviceUploadFileDemo
主要的代码实现是在文件FileUploadDemo.cs, 其中最重要的代码部分是:
初始化文件上传:
const string filePath = "TestPayload.txt";

  using var fileStreamSource = new FileStream(filePath, FileMode.Open);
  var fileName = Path.GetFileName(fileStreamSource.Name);

  Console.WriteLine($"Uploading file {fileName}");

  var fileUploadTime = Stopwatch.StartNew();

  var fileUploadSasUriRequest = new FileUploadSasUriRequest
  {
      BlobName = fileName
  };

  // Note: GetFileUploadSasUriAsync and CompleteFileUploadAsync will use HTTPS as protocol regardless of the DeviceClient protocol selection.
  Console.WriteLine("Getting SAS URI from IoT Hub to use when uploading the file...");
  FileUploadSasUriResponse sasUri = await _deviceClient.GetFileUploadSasUriAsync(fileUploadSasUriRequest);
  Uri uploadUri = sasUri.GetBlobUri();

  Console.WriteLine($"Successfully got SAS URI ({uploadUri}) from IoT Hub");
在取得了连接
Blob的SAS连接字符串,然后使用如下的代码进行上传:var blockBlobClient = new BlockBlobClient(uploadUri); await blockBlobClient.UploadAsync(fileStreamSource, new BlobUploadOptions());
如果上传失败,也可以生成一个上传失败的通知:
        Console.WriteLine($"Failed to upload file to Azure Storage using the Azure Storage SDK due to {ex}");

         var failedFileUploadCompletionNotification = new FileUploadCompletionNotification
         {
             // Mandatory. Must be the same value as the correlation id returned in the sas uri response
             CorrelationId = sasUri.CorrelationId,

             // Mandatory. Will be present when service client receives this file upload notification
             IsSuccess = false,

             // Optional, user-defined status code. Will be present when service client receives this file upload notification
             StatusCode = 500,

             // Optional, user defined status description. Will be present when service client receives this file upload notification
             StatusDescription = ex.Message
         };

         // Note that this is done even when the file upload fails. IoT Hub has a fixed number of SAS URIs allowed active
         // at any given time. Once you are done with the file upload, you should free your SAS URI so that other
         // SAS URIs can be generated. If a SAS URI is not freed through this API, then it will free itself eventually
         // based on how long SAS URIs are configured to live on your IoT Hub.
         await _deviceClient.CompleteFileUploadAsync(failedFileUploadCompletionNotification);
         Console.WriteLine("Notified IoT Hub that the file upload failed and that the SAS URI can be freed");

         fileUploadTime.Stop();
上传成功了之后也发送一个通知:
    Console.WriteLine("Successfully uploaded the file to Azure Storage");

     var successfulFileUploadCompletionNotification = new FileUploadCompletionNotification
     {
         // Mandatory. Must be the same value as the correlation id returned in the sas uri response
         CorrelationId = sasUri.CorrelationId,

         // Mandatory. Will be present when service client receives this file upload notification
         IsSuccess = true,

         // Optional, user defined status code. Will be present when service client receives this file upload notification
         StatusCode = 200,

         // Optional, user-defined status description. Will be present when service client receives this file upload notification
         StatusDescription = "Success"
     };

     await _deviceClient.CompleteFileUploadAsync(successfulFileUploadCompletionNotification);
     Console.WriteLine("Notified IoT Hub that the file upload succeeded and that the SAS URI can be freed.");

     fileUploadTime.Stop();

     Console.WriteLine($"Time to upload file: {fileUploadTime.Elapsed}.");
以上就是主要的步骤了,可以从代码上下载测试代码测试一下。
注意
实例代码中使用了包CommandLineParse, 发现这个包在.Net 7上有一个bug, 在使用dotnet run -来运行并且在参数上使用短参数的形式,会报错。但是可以发布应用再运行就没有这个问题了。
运行:
 .\DeviceUploadFileDemo.exe -c "你的设备连接字符串" -t "Mqtt"
Uploading file TestPayload.txt
Getting SAS URI from IoT Hub to use when uploading the file...
Successfully got SAS URI (https://{your storage account}.blob.core.chinacloudapi.cn/uploadfiles/testdevice1%2FTestPayload.txt?sv=2018-03-28&sr=b&sig=) from IoT Hub
Uploading file TestPayload.txt using the Azure Storage SDK and the retrieved SAS URI for authentication
Successfully uploaded the file to Azure Storage
Notified IoT Hub that the file upload succeeded and that the SAS URI can be freed.
Time to upload file: 00:00:02.3546810.
Done.
到这里我们就完成了文件上传了,下面我们接着测试监听文件上传的事件。
监听文件上传完成的通知
创建一个控制台应用:
dotnet new console -o ReadFileUploadNotification
cd ReadFileUploadNotification
dotnet add package Microsoft.Azure.Devices
然后使用编辑器打开文件'Program.cs', 主要内容如下:
using Microsoft.Azure.Devices;

ServiceClient serviceClient;
string connectionString = "{iot hub connection string}";

Console.WriteLine("Receive file upload notifications\n");
serviceClient = ServiceClient.CreateFromConnectionString(connectionString);
ReceiveFileUploadNotificationAsync(serviceClient);
Console.WriteLine("Press Enter to exit\n");
Console.ReadLine();


async void ReceiveFileUploadNotificationAsync(ServiceClient serviceClient)
{
    var notificationReceiver = serviceClient.GetFileNotificationReceiver();
    Console.WriteLine("\nReceiving file upload notification from service");
    while (true)
    {
        var fileUploadNotification = await notificationReceiver!.ReceiveAsync();
        if (fileUploadNotification == null) continue;
        Console.ForegroundColor = ConsoleColor.Yellow;
        Console.WriteLine("Received file upload notification: {0}",
          string.Join(", ", fileUploadNotification.BlobName));
        Console.ResetColor();
        await notificationReceiver!.CompleteAsync(fileUploadNotification);
    }
}
运行该代码,就可以看到:
Receive file upload notifications


Receiving file upload notification from service
Press Enter to exit

Received file upload notification: testdevice1/TestPayload.txt
Received file upload notification: testdevice1/TestPayload.txt