开发Azure IoT Edge模块
分类: Azure物联网 ◆ 标签: #Azure #IoT Edge # ◆ 发布于: 2023-06-14 22:13:29

前面我们已经有两篇文章详细的讨论和如何为了开发一个Azure IoT Edge模块项目的环境准备以及最佳实践,关于这两篇文章,您可以参考如下的地址:
- https://www.azuredeveloper.cn/article/how-to-setup-a-enviroment-for-azure-iot-edge-module-develop
- https://www.azuredeveloper.cn/article/setup-tools-best-pratice-for-azure-iot-edge-module-develop
如果你要详细的阅读环境的准备的话,您可以再回头去学习这两篇文章。
我们今天来学习如何使用环境开发调试我们的Azure IoT Edge的模块。
开始开发Azure IoT Edge模块
按照前面的两篇文章,我们已经熟悉了如何利用VS Code的Azure IoT Edge插件来进行开发一个新项目了,具体的步骤如下:
打开
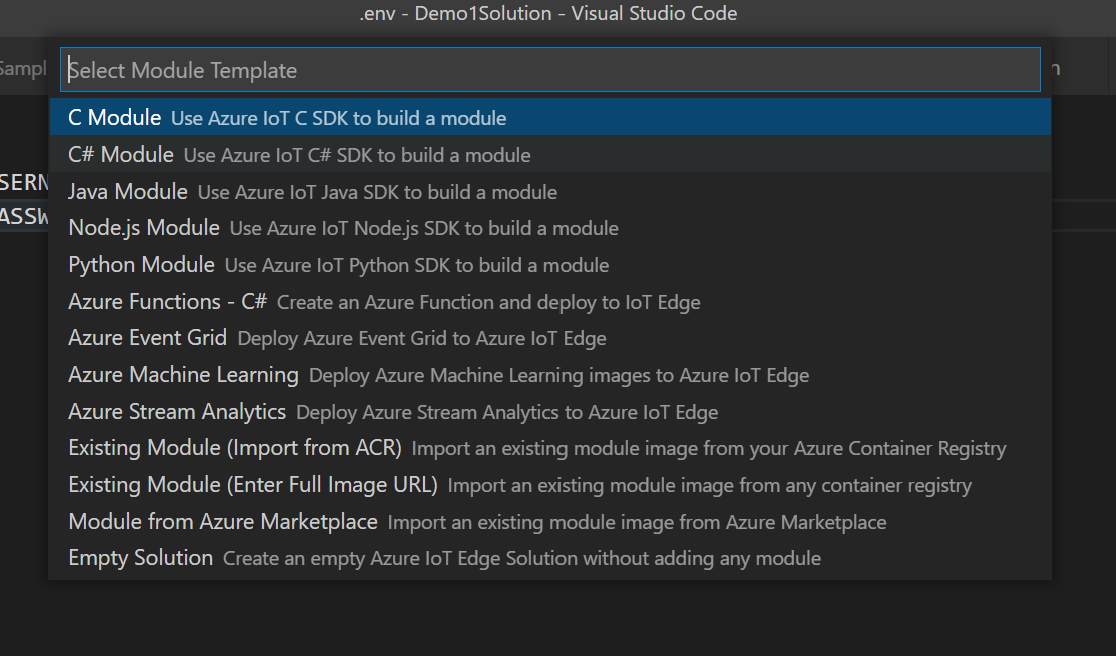
VS code,按Ctrl + Shift + P启动command Palette, 输入:Azure IoT Edge: New IoT Edge Solution, 如下图:

然后
vs code要求选择一个目录用于存储你即将开发的一个新项目,选择目录后,你要给你的项目命名,如下图:

然后选择您需要用于开发的语言,例如
C#, 如下图:
需要给您的模块命名,如下图:

选择您需要push镜像的服务的地址,例如
Docker Hub或者Azure Container register, 如下图:

支持我们的新项目创建成功了。下面我们来一一解析整个项目的基本情况,以及如何进行快速的开发。
解析模块的开发
关于我们创建的项目是使用Azure IoT Edge插件创建的模板,关于整个模块创建的目录结构说明,我们上一篇文档已经提及过了:https://www.azuredeveloper.cn/article/setup-tools-best-pratice-for-azure-iot-edge-module-develop, 无论您选择那种语言,默认的代码放置目录modules, 一个模块一个目录。我们这里以.Net为主要的语言梳理一下如何进行开发。
.Net的项目文件
默认创建的项目是模块名 + .csproj的文件, 基本的文件内容如下:
<Project Sdk="Microsoft.NET.Sdk">
  <PropertyGroup>
    <OutputType>Exe</OutputType>
    <TargetFramework>netcoreapp3.1</TargetFramework>
  </PropertyGroup>

  <PropertyGroup Condition="'$(Configuration)|$(TargetFramework)|$(Platform)'=='Debug|netcoreapp3.1|AnyCPU'">
    <TreatWarningsAsErrors>True</TreatWarningsAsErrors>
    <TreatSpecificWarningsAsErrors />
  </PropertyGroup>

  <ItemGroup>
    <ProjectCapability Include="AzureIoTEdgeModule"/>
  </ItemGroup>

  <ItemGroup>
    <PackageReference Include="Microsoft.Azure.Devices.Client" Version="1.*" />
    <PackageReference Include="Microsoft.Extensions.Configuration" Version="2.1.1" />
    <PackageReference Include="Microsoft.Extensions.Configuration.Abstractions" Version="2.1.1" />
    <PackageReference Include="Microsoft.Extensions.Configuration.Binder" Version="2.1.1" />
    <PackageReference Include="Microsoft.Extensions.Configuration.EnvironmentVariables" Version="2.1.1" />
    <PackageReference Include="Microsoft.Extensions.Configuration.FileExtensions" Version="2.1.1" />
    <PackageReference Include="Microsoft.Extensions.Configuration.Json" Version="2.0.0" />
    <PackageReference Include="System.Runtime.Loader" Version="4.3.0" />
  </ItemGroup>
</Project>
项目文件中主要需要理解的有三个部分:
指定了
TargetFramework为netcoreapp3.1, 这个非常重要。指定项目必须应用的项目能力:
<ItemGroup>
    <ProjectCapability Include="AzureIoTEdgeModule"/>
</ItemGroup>
3, 引用了必须的包,即:<ProjectCapability Include="AzureIoTEdgeModule"/>
这个是我们的项目文件,其他的语言也是类似的。
代码的结构
总的来说,整个模块的代码实质最后还是要运行在一个docker环境里,因此无论是那种语言所开发的应用,基本上都是一个基于控制台的应用,也即Console App, 针对于.Net的应用,我们在整个像目录主要的程序入口是文件:Program.cs, 其他的语言应用的入口文件是:
Java: 入口文件App.javaNode.js: 入口文件app.js
在每种开发语言的入口文件中,入口函数如何定义,请依赖于开发语言的特性定义,例如.Net是Program类的Main方法,Java是App.java里的类的main方法。
控制台应用的驻留
由于我们实质上是一个控制台应用,因此我们需要考虑该应用是如何驻留的,我们简要的看一下基于.Net的Main函数的驻留:
static void Main(string[] args)
{
    Init().Wait();

    // Wait until the app unloads or is cancelled
    var cts = new CancellationTokenSource();
    AssemblyLoadContext.Default.Unloading += (ctx) => cts.Cancel();
    Console.CancelKeyPress += (sender, cpe) => cts.Cancel();
    WhenCancelled(cts.Token).Wait();
}
在这个案例中,我们应用逻辑的所有入口全部由函数Init()来进行启动。但是驻留是由后面的var cts开始到WhenCancelled函数的结束。
按照这个模板格式,我们所有的业务逻辑都可以由Init()函数进行启动和组织。
应用可以应用的资源
应用中可以应用的资源我们可以由之前的项目文件看到我们引入了很多的包,特别是和Azure IoT Hub客户端相关的,由于我们这里是开发Azure IoT Edge的模块,因此主要可以使用的ModuleClient, 关于这个部分大家可以参考Azure IoT Hub Client SDK, 来仔细的参考API, 主要用于完成:
Module Twin的更新Module Direct method方法调用。- 以及接受
C2D消息。 - 发送
D2C消息。
这里有一个很重要的概念,就是模块如何连接到Azure IoT Hub, 关于这个部分,我们之前已经有文档讨论过这个问题,您可以参考这个文档:https://www.azuredeveloper.cn/article/deep-into-azure-iot-ede, 也即模块实质上是通过EdgeHub模块和Azure IoT Hub的沟通,所以我们需要配置edgeAgent和edgeHub在本地的storage, 关于这个部分,您可以参考:https://www.azuredeveloper.cn/article/step-by-step-for-deploy-iot-edge-module-to-scale, 我们这里使用create Option来完成这部分配置。
请参考如下的语句来创建一个ModuleClient:
    MqttTransportSettings mqttSetting = new MqttTransportSettings(TransportType.Mqtt_Tcp_Only);
    ITransportSettings[] settings = { mqttSetting };

    // Open a connection to the Edge runtime
    ModuleClient ioTHubModuleClient = await ModuleClient.CreateFromEnvironmentAsync(settings);
    await ioTHubModuleClient.OpenAsync();
    Console.WriteLine("IoT Hub module client initialized.");
这段代码里,需要注意的是,EdgeHub本身就是一个MQTT的消息代理服务器的实现,因此在Azure IoT Edge模块中必须使用MQTT协议来连接Edge Hub, 而连接Edge Hub的方式即是通过函数CreateFromEnvironmentAsync来完成,完成连接之后,然后打开连接:await ioTHubModuleClient.OpenAsync();
支持就可以将本模块以及EdgeHub连接起来了。
处理input和output
我们可以在模块里定义多个input作为消息的输入,这个输入是可以从edgeHub过来的输入,也可以是从其他模块过来的输入,我们需要在这里定义我们需要读取的输入,例如我们需要从外界读入:
await ioTHubModuleClient.SetInputMessageHandlerAsync("input1", PipeMessage, ioTHubModuleClient);
请注意这里的"input1", 这里我们需要理解一下edgeHub的消息路由,关于消息路由,您可以参考文档:https://www.azuredeveloper.cn/article/how-to-understand-edge-hub-route
您可以定义本消息模块的输出,使用如下的方式:
await moduleClient.SendEventAsync("output1", pipeMessage);
刚刚我们讲了edgeHub是如何对消息路由的,您可以参考我们的文档,但是在Azure IoT Edge项目中,我们是通过根目录的deployment.template.json文件和deployment.debug.template.json文件来定义消息的路由的,实例如下:
   "$edgeHub": {
      "properties.desired": {
        "schemaVersion": "1.1",
        "routes": {
          "Sample2ModuleToIoTHub": "FROM /messages/modules/Sample2Module/outputs/* INTO $upstream",
          "sensorToSample2Module": "FROM /messages/modules/SimulatedTemperatureSensor/outputs/temperatureOutput INTO BrokeredEndpoint(\"/modules/Sample2Module/inputs/input1\")"
        },
        "storeAndForwardConfiguration": {
          "timeToLiveSecs": 7200
        }
关于直接方法,twin的更新等等,可以直接参考SDK的文档。
实战
我们前面基本讲清楚了Azure IoT Edge模块开发的基本步骤,我们现在来实战一下,刚刚如果你已经通过了项目的创建,那么目前你已经有了一个Demo2Solution的项目,并且也已经有了一个Sample2Module的模块。
更改Init方法
首先打开vs code的terminal, 然后切换路径到模块所在路基,例如:IoTEdgeProjects\Demo2Solution\modules\Sample2Module>, 先运行:dotnet restore
我们首先新增加几个引用,在文件Program.cs中添加如下的包引用
using System.Collections.Generic;     // For KeyValuePair<>
using Microsoft.Azure.Devices.Shared; // For TwinCollection
using Newtonsoft.Json;                // For JsonConvert
在类Program里添加一个filed的定义和几个辅助类的定义:
static int temperatureThreshold { get; set; } = 25;
辅助类
class MessageBody
{
    public Machine machine {get;set;}
    public Ambient ambient {get; set;}
    public string timeCreated {get; set;}
}
class Machine
{
    public double temperature {get; set;}
    public double pressure {get; set;}
}
class Ambient
{
    public double temperature {get; set;}
    public int humidity {get; set;}
}
更改Init方法:
// Register a callback for messages that are received by the module.
// await ioTHubModuleClient.SetInputMessageHandlerAsync("input1", PipeMessage, iotHubModuleClient);

// Read the TemperatureThreshold value from the module twin's desired properties
var moduleTwin = await ioTHubModuleClient.GetTwinAsync();
await OnDesiredPropertiesUpdate(moduleTwin.Properties.Desired, ioTHubModuleClient);

// Attach a callback for updates to the module twin's desired properties.
await ioTHubModuleClient.SetDesiredPropertyUpdateCallbackAsync(OnDesiredPropertiesUpdate, null);

// Register a callback for messages that are received by the module. Messages received on the inputFromSensor endpoint are sent to the FilterMessages method.
await ioTHubModuleClient.SetInputMessageHandlerAsync("inputFromSensor", FilterMessages, ioTHubModuleClient);
注释行await ioTHubModuleClient.SetInputMessageHandlerAsync("input1", PipeMessage, iotHubModuleClient);, 然后再其后面添加行,用于:
- 监听
module twin的更新 - 设置消息的输入为
inputFromSensor, 并且使用方法FilterMessage作为call back
module twin更改方法的定义
static Task OnDesiredPropertiesUpdate(TwinCollection desiredProperties, object userContext)
{
    try
    {
        Console.WriteLine("Desired property change:");
        Console.WriteLine(JsonConvert.SerializeObject(desiredProperties));

        if (desiredProperties["TemperatureThreshold"]!=null)
            temperatureThreshold = desiredProperties["TemperatureThreshold"];

    }
    catch (AggregateException ex)
    {
        foreach (Exception exception in ex.InnerExceptions)
        {
            Console.WriteLine();
            Console.WriteLine("Error when receiving desired property: {0}", exception);
        }
    }
    catch (Exception ex)
    {
        Console.WriteLine();
        Console.WriteLine("Error when receiving desired property: {0}", ex.Message);
    }
    return Task.CompletedTask;
}
输入消息监听函数
static async Task<MessageResponse> FilterMessages(Message message, object userContext)
{
    var counterValue = Interlocked.Increment(ref counter);
    try
    {
        ModuleClient moduleClient = (ModuleClient)userContext;
        var messageBytes = message.GetBytes();
        var messageString = Encoding.UTF8.GetString(messageBytes);
        Console.WriteLine($"Received message {counterValue}: [{messageString}]");

        // Get the message body.
        var messageBody = JsonConvert.DeserializeObject<MessageBody>(messageString);

        if (messageBody != null && messageBody.machine.temperature > temperatureThreshold)
        {
            Console.WriteLine($"Machine temperature {messageBody.machine.temperature} " +
                $"exceeds threshold {temperatureThreshold}");
            using (var filteredMessage = new Message(messageBytes))
            {
                foreach (KeyValuePair<string, string> prop in message.Properties)
                {
                    filteredMessage.Properties.Add(prop.Key, prop.Value);
                }

                filteredMessage.Properties.Add("MessageType", "Alert");
                await moduleClient.SendEventAsync("output1", filteredMessage);
            }
        }

        // Indicate that the message treatment is completed.
        return MessageResponse.Completed;
    }
    catch (AggregateException ex)
    {
        foreach (Exception exception in ex.InnerExceptions)
        {
            Console.WriteLine();
            Console.WriteLine("Error in sample: {0}", exception);
        }
        // Indicate that the message treatment is not completed.
        var moduleClient = (ModuleClient)userContext;
        return MessageResponse.Abandoned;
    }
    catch (Exception ex)
    {
        Console.WriteLine();
        Console.WriteLine("Error in sample: {0}", ex.Message);
        // Indicate that the message treatment is not completed.
        ModuleClient moduleClient = (ModuleClient)userContext;
        return MessageResponse.Abandoned;
    }
}
更改消息路由和模块部署设置
由于我们这里重新定义了输入和输出,因此我们还需要更改文件deployment.template.json:
打开文件deployment.template.json:
"sensorToSample2Module": "FROM /messages/modules/SimulatedTemperatureSensor/outputs/temperatureOutput INTO BrokeredEndpoint(\"/modules/Sample2Module/inputs/inputFromSensor\")"
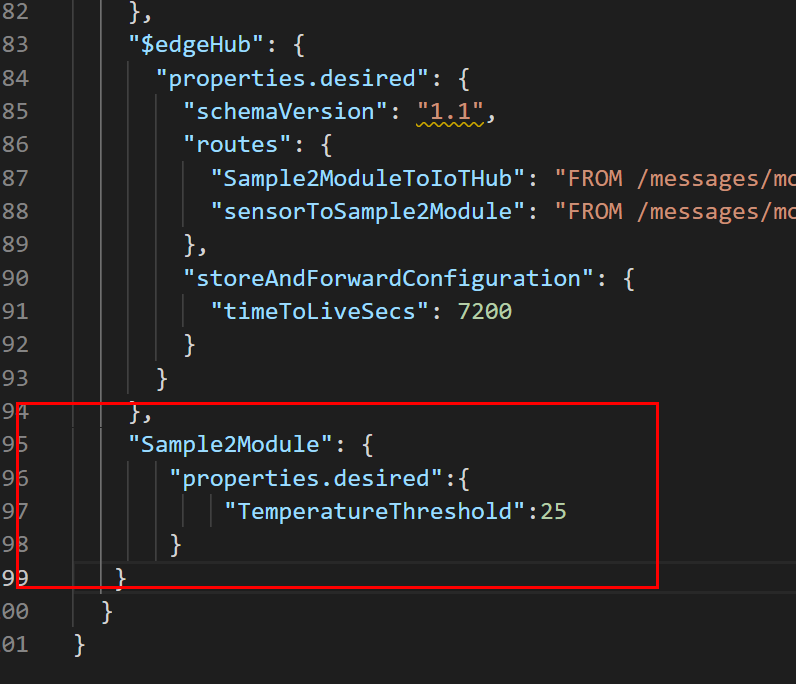
同时定义Sample2Module的部署预期属性:
    "Sample2Module": {
       "properties.desired":{
           "TemperatureThreshold":25
       }
   }
如下图:
至此我们全部需要开发的代码已经完成了。
发布应用
在发布应用之前,请一定记得检查如下的checklist:
- 设置了
Azure IoT Edge runtime Version - 设置了
Azure IoT Edge target platrom
关于如何设置,请参考前面的文章。
然后打开vs code的`terminal, 运行如下的命令:
docker login -u <ACR username> -p <ACR password> <ACR login server>
然后找到项目根目录下deployment.template.json, 点击邮件,选择docker login -u <ACR username> -p <ACR password> <ACR login server>, 即完成了发布。
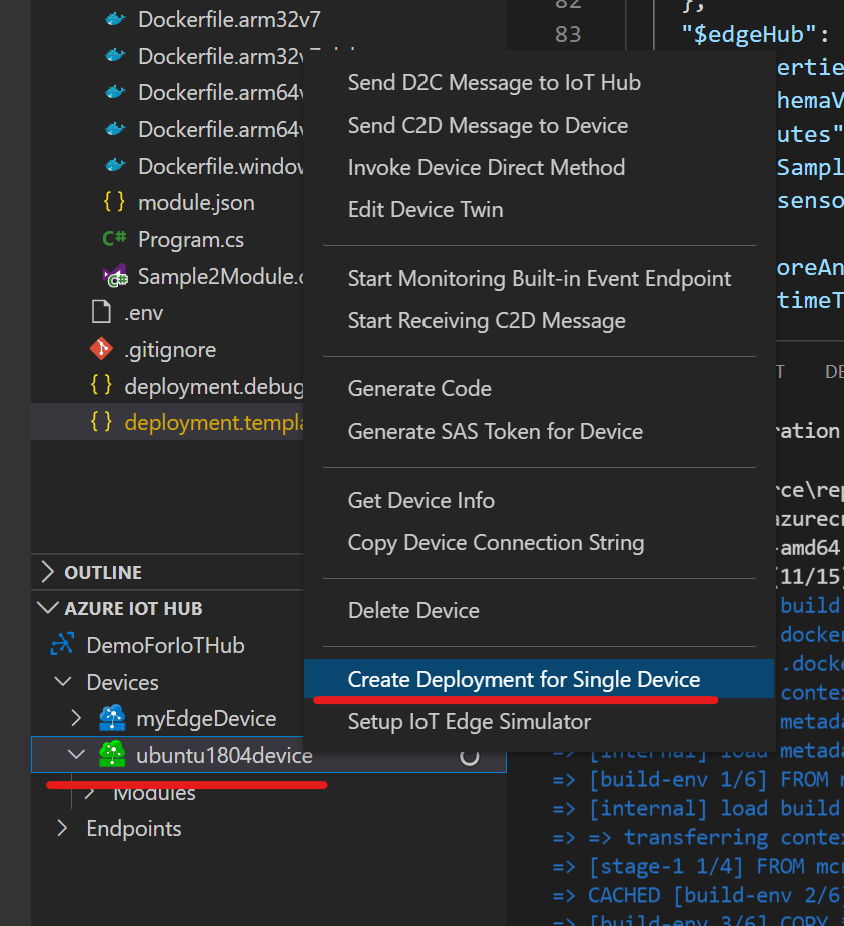
在测试机器上部署该模块
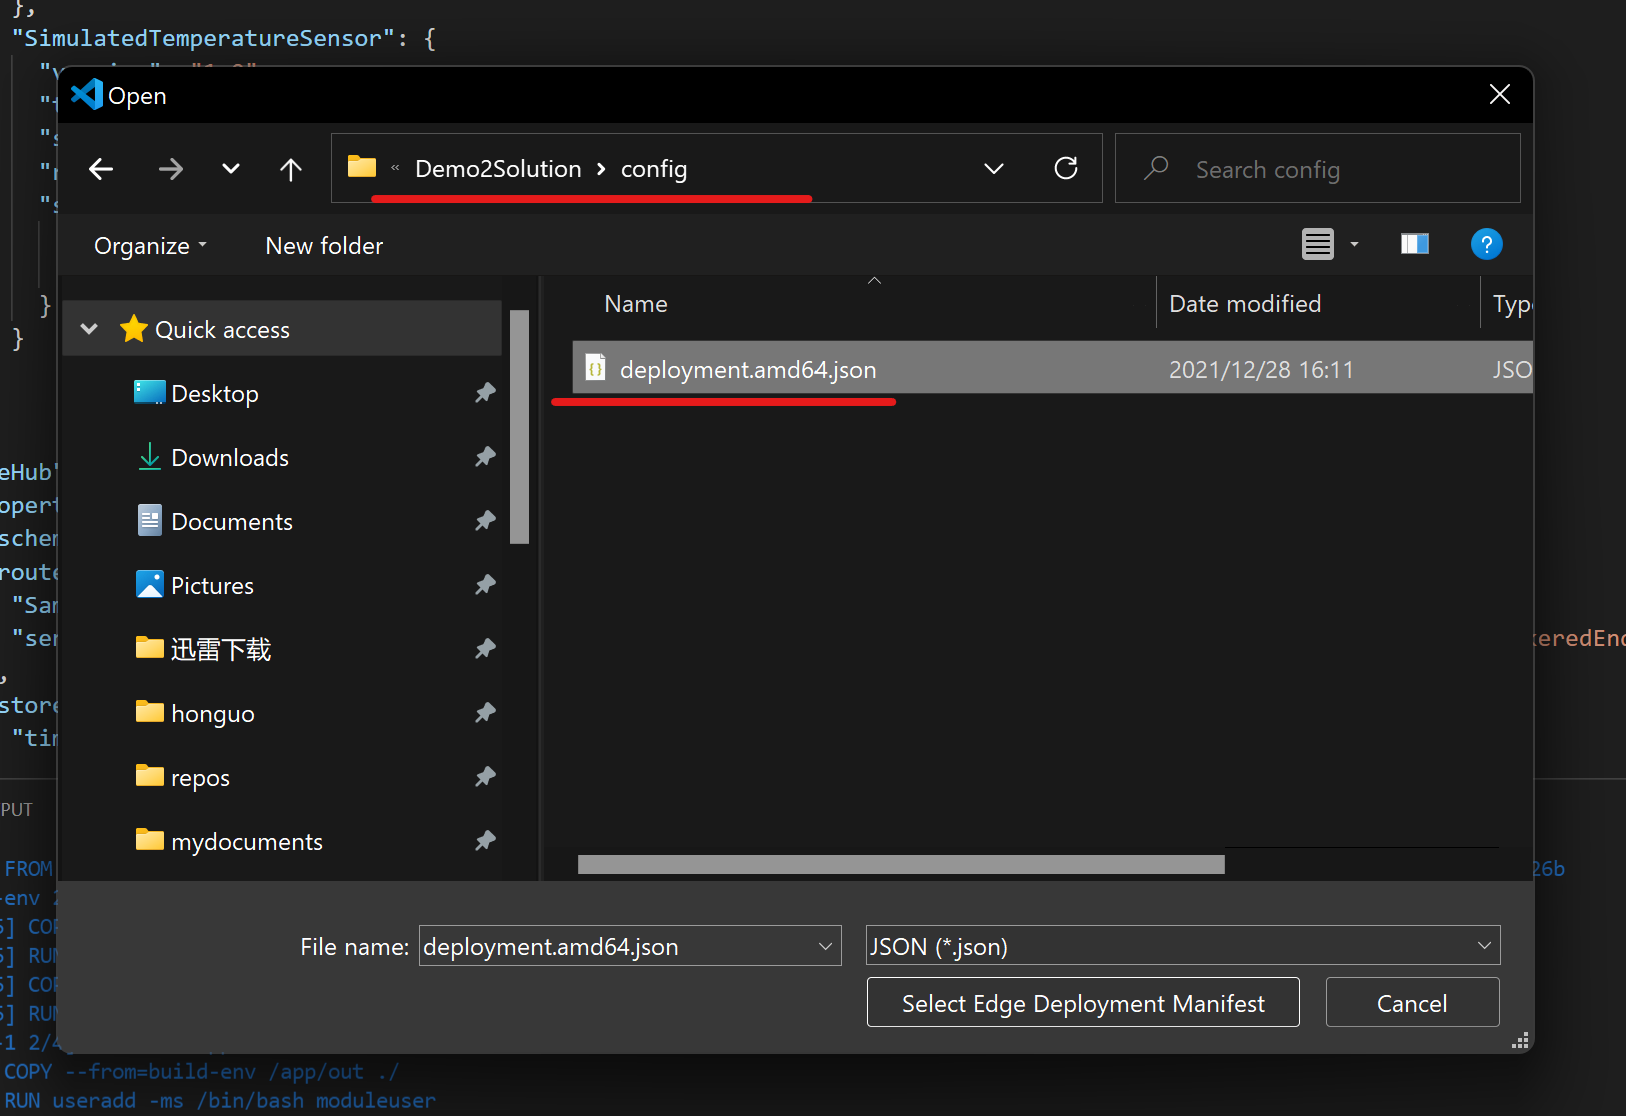
我们之前在vs code上配置了Azure IoT Hub,您可以在vs code里找到您的默认Azure IoT Hub, 并找到你用于测试的设备,点击右键,选择Create Deployment for Single Device, 然后弹出提示选择项目根目录下的config\deployment.amd64.json(注意必须是发布之后才有这个目录和文件,一定是deployment.amd64.json, 而不是原始的deployment.template.json文件), 这样就可以将新开发的模块部署到您的测试机器上了,如下图:
开始创建一个新的单设备的部署:
选择部署的文件config\deployment.amd64.json:
最终完成部署;
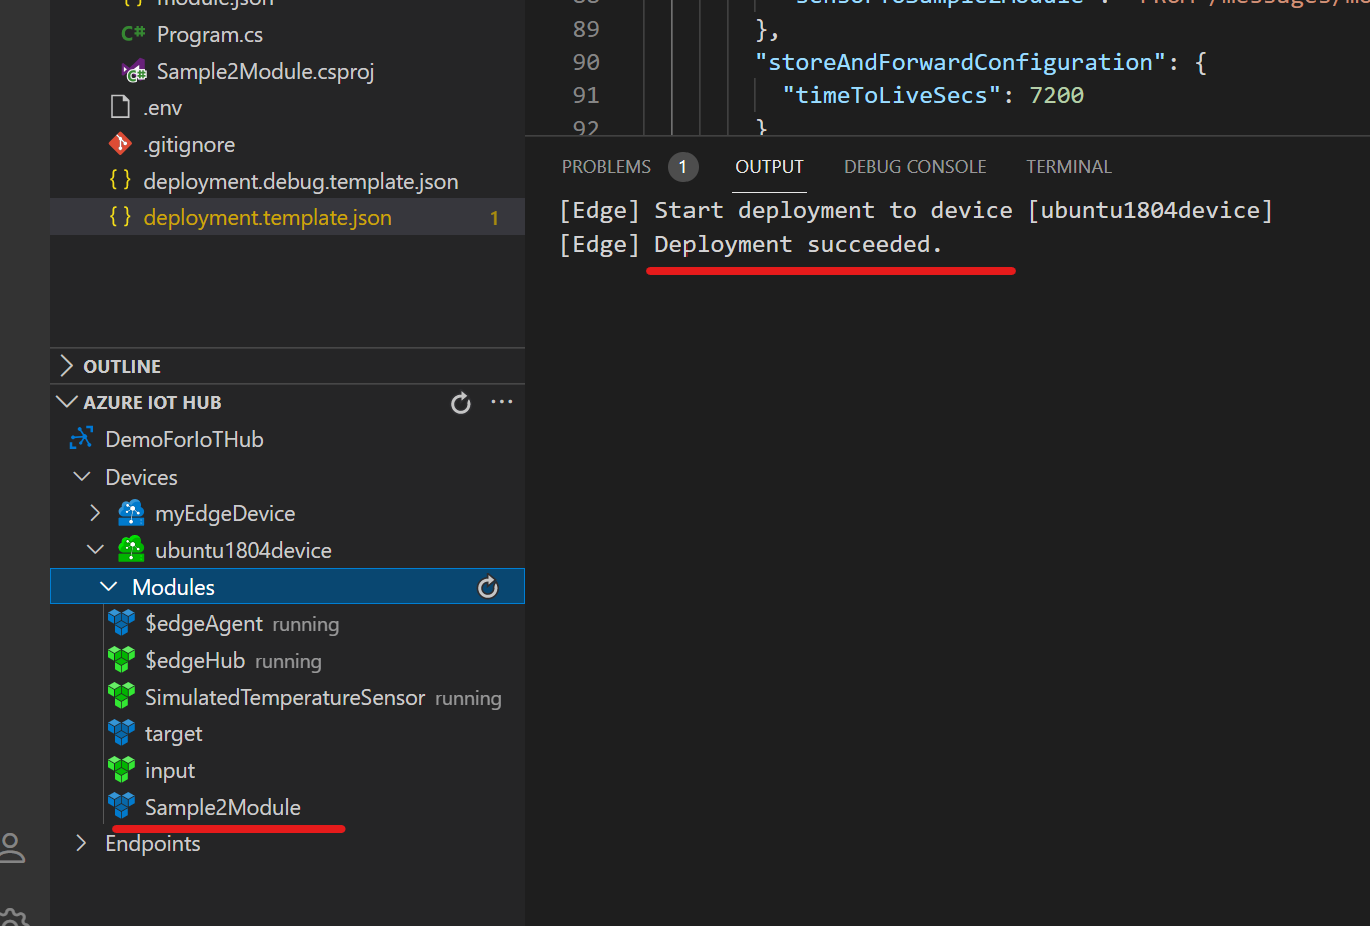
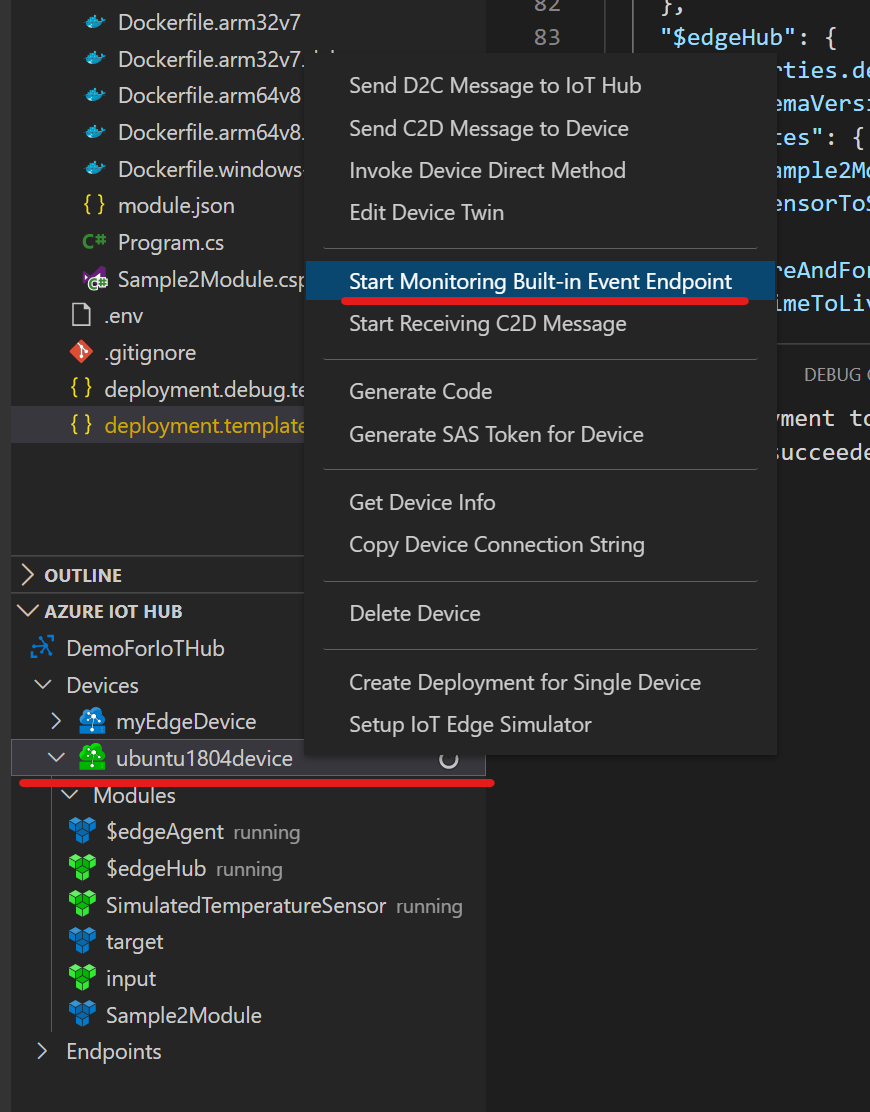
如果要观察模块的结果,您可以如下图:
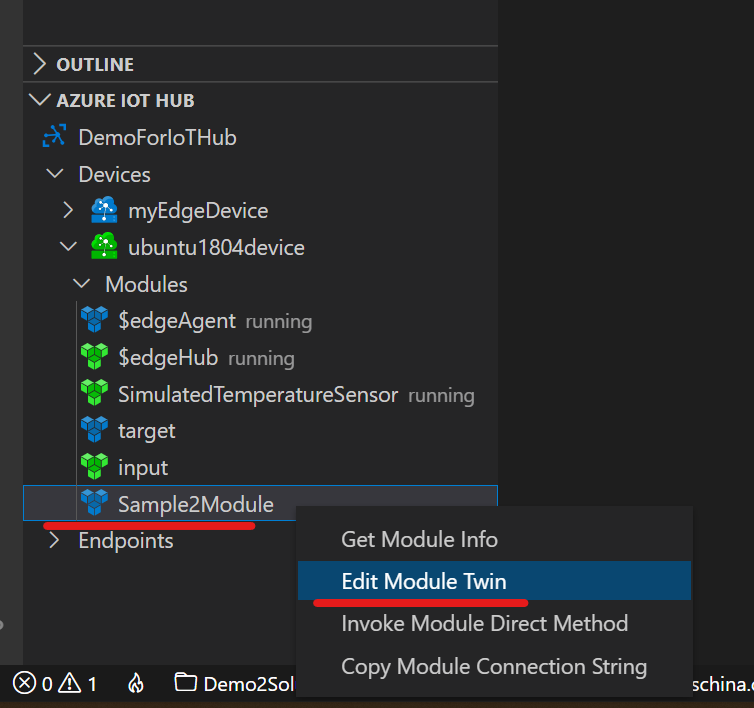
如果你需要触发module twin, 您可以如下图编辑module twin, 然后保存,然后update module twin:
更改module twin:
更改后,更新:
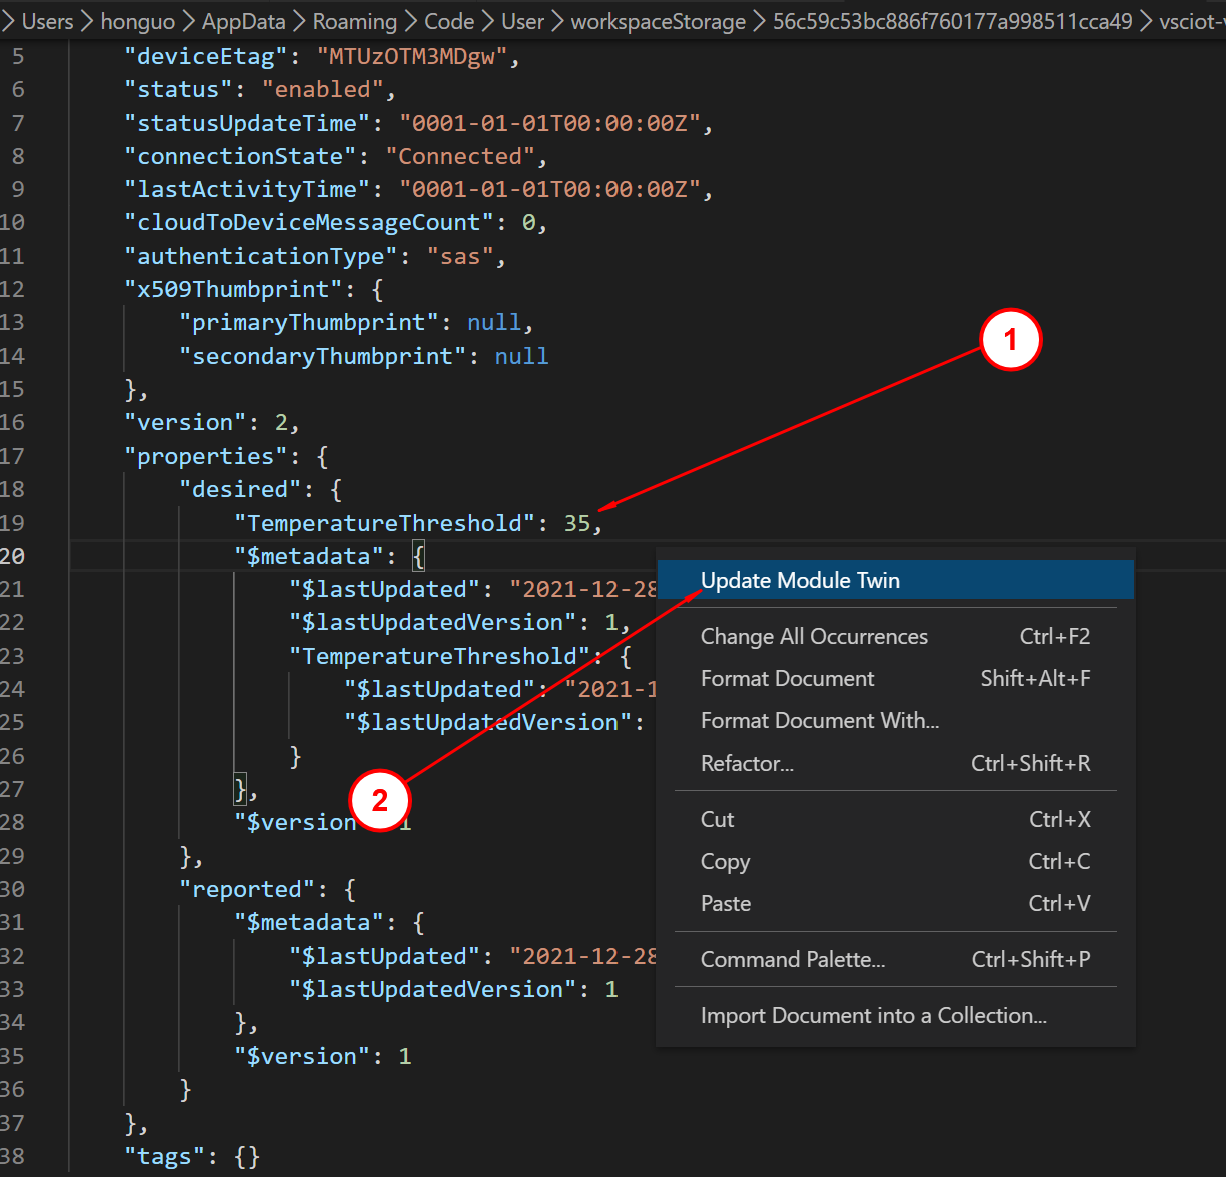
请仔细看图里1, 是更改数值从25到35, 保存后,然后选择2的菜单更新。