基于.Net SDK的内容审查服务快速入门
分类: Azure认知服务 ◆ 标签: #Azure #人工智能 #内容审查 ◆ 发布于: 2023-06-05 13:04:27

我们前面的文章已经介绍了什么是内容审查服务,以及内容审查服务提供的工具以及服务,同时前面的文章我们也介绍了如何在 Azure 上创建一个认知服务,请记得保存好上节创建好的服务的相关信息,具体的我们需要如下的信息:
- 内容审查服务的 endpoint
- 内容审查服务访问的 Keys
- 内容审查服务所在的区域
本节我们使用.Net 5 作为我们的学习平台,下一节我们使用 Python 以及直接使用 curl 调用 rest api 作为实例,每个实例都会简要的介绍使用认知服务的一般流程以及业务逻辑,希望能够帮助大家快速的入门,并快速的和自己的应用进行集成。
本节实例需要完成下午三个功能:
- 对用输入的文本内容进行审查,帮输出审查的结果。
- 对用户输入的图片进行审查,并输出审查结果。
- 使用.Net SDK 创建内容审查工作流,配合人工审阅并输出内容(这里需要理解一下使用内容审查 API 和人工审阅的区别,以及二者之间的关系)
参考文档
- .Net 参考文档 API Refrence
- .Net 包源代码参考 SDK SourceCode Project
- .Net 包地址 Nuget Package
- 本节的 Demo 源代码 Demo Code
实例讲解 Step by Step
创建一个控制台应用
开始之前请首先确认自己已经安装了.Net 5 的环境以及 SDK, 如果没有安装可以从该网址下载最新的稳定版的.Net 5 的 SDK .Net 5, 安装好 dotnet 之后,请打开一个控制台,使用如下的命令创建一个新的项目,并向其中添加需要引用的包
    dotnet new console -n ContentModerator
    cd ContentModerator
    dotnet add package Microsoft.Azure.CognitiveServices.ContentModerator
    code .
如上就已经安装好了我们需要的包,请使用 IDE 或者编辑器打开这个项目,例如 vs code. 我个人使用的是 vs code, 编辑文件Program.cs, 并在文件头引用如下的名称空间
using Microsoft.Azure.CognitiveServices.ContentModerator;
using Microsoft.Azure.CognitiveServices.ContentModerator.Models;
using Newtonsoft.Json;
using System;
using System.Collections.Generic;
using System.IO;
using System.Text;
using System.Threading;
定义内容审查服务 endpoint 和 Key
我们在前一节已经创建了内容审查服务,并且得到了内容审查服务的 Keys 和 endpoint, 我们需要将这两个值定义到类中去, 在我们刚刚创建完的项目中的类Program.cs中定义私有的字段:
        //内容审查服务的Key和endpoint
        private static readonly string SubscriptionKey = "<Keys>";
        private static readonly string Endpoint = "<Endpoint>";
上述代码中SubscriptionKey是内容审查服务中得到的key, EndPoint是内容审查服务创建完之后得到的 endpoint, 这两个字段的值从之前创建的内容审查服务的页面可以得到。
定义方法用户登录内容审查服务和返回内容审查客户端
在类Program.cs中定义一个方法用户从内容审查服务中认证并获取一个客户端。我们上面已经定义了认证需要的 key 和 endpoint, 那么这里我们直接定义方法就好了
//定义内容审查服务器的客户端
//需要注意的是审阅服务的各种客户端都是通过类ContentModeratiorClient来返回的
public static ContentModeratorClient Authenticate(string key, string endpoint)
{
    ContentModeratorClient client = new ContentModeratorClient(new ApiKeyServiceClientCredentials(key));
    client.Endpoint = endpoint;

    return client;
}
该静态方法的参数是我们之前已经定义过的key和endpoint。
文本审查
现在我们已经定义了通用的方法和变量了,那么接下来我们需要先展示第一个实例,对文本的内容进行审查。
本例中,我们将从文本文件中导入文本内容,然后由生成的内容审查的客户端,由该客户端对文本内容进行审查之后,同时将审查的结果写入到我们定义好的输出文件中。
我们先在类Program.cs中定义两个字段,这个两个字段分别用于定义文本内容输入的文件名和审查结果输出的文件名
// 文本内容审查
// 文本内容输入的文件名
private static readonly string TextFile = "TextFile.txt";
//内容审查结果的输出文件名
private static string TextOutputFile = "TextModerationOutput.txt";
在项目的根目录下创建文件TextFile.txt, 作为文本内容的输入文件,同时在该文件中保存如下的文本类容
Is this a grabage email abcdef@abcd.com, phone: 4255550111, IP: 255.255.255.255, 1234 Main Boulevard, Panapolis WA 96555.
Crap is the profanity here. Is this information PII? phone 4255550111
然后保存该文件
之前我们已经定义了方法Authenticate, 该方法会返回一个内容审查服务的客户端实例,我们可以使用该客户端进行文本的内容审查,为了完成文本内容审查,继续定义一个专门用于文本审查的业务方法:
        /*
        *   审查文本的内容
        *   本实例的文本内容从文件读入就可以了
         */
        public static void ModerateText(ContentModeratorClient client, string inputFile, string outputFile)
        {
            Console.WriteLine("--------------------------------------------------------------");
            Console.WriteLine();
            Console.WriteLine("文本内容审查");
            Console.WriteLine();
            // Load the input text.
            string text = File.ReadAllText(inputFile);

            // 去掉换行符
            text = text.Replace(Environment.NewLine, " ");
            //将文本内容转换为字节,适应流读写
            byte[] textBytes = Encoding.UTF8.GetBytes(text);
            MemoryStream stream = new MemoryStream(textBytes);

            Console.WriteLine("开始扫描文件: {0}...", inputFile);

            //将内容审查的结果写入一个外部文件
            using (StreamWriter outputWriter = new StreamWriter(outputFile, false))
            {
                using (client)
                {
                    //审查文本内容,对不适合的内容进行分类,同时启用文本自动更正
                    outputWriter.WriteLine("自动更正拼写错误,检查是否有个人身份识别信息以及分类。.");

                    // 审查内容
                    var screenResult = client.TextModeration.ScreenText("text/plain", stream, "eng", true, true, null, true);
                    outputWriter.WriteLine(JsonConvert.SerializeObject(screenResult, Formatting.Indented));
                }

                outputWriter.Flush();
                outputWriter.Close();
            }

            Console.WriteLine("审查结果被写入文件: {0}", outputFile);
            Console.WriteLine();
        }
这个方法我已经添加了适当的注释,最核心的方法就是
var screenResult = client.TextModeration.ScreenText("text/plain", stream, "eng", true, true, null, true);
该方法就是将已经形成了流的文本发送至文本审查服务,通过内容审查服务审查,然后返回一个审查结构,然后由outputWriter写入到我们定义好的输出文件。
到这里我们已经定义好了我们需要的各种变量以及方法,我们需要在Program.cs中的Main()方法中进行调用,代码如下:
//定义一个文本审阅客户端
ContentModeratorClient clientText = Authenticate(SubscriptionKey, Endpoint);
//审查文本内容
ModerateText(clientText, TextFile, TextOutputFile);
至此你可以在项目的根目录下运行你的应用了:
dotnet run
从我们已经定义好的输出文本文件中你即可以观察到内容审查的结果。
图片审查
前一个小结我们完成了对文本内容的审查,你可以通过更改文本的内容,然后多次运行观察内容审查服务的结果。本节我们来观察如何使用内容审查服务对图片进行审查。
我们计划使用存放在网上的两种图片进行内容审查,同样我们也会使用两个字段来定义我们需要的数据,一个字段用于定义保存有图片地址的文本文件组成,另外一个文件用于存储内容审查结果。两个字段的定义如下:
// 图片内容审查
//定义一个文本文件,该文本文件包含有图片存放的URL
private static readonly string ImageUrlFile = "ImageFiles.txt";
//定义一个用户输出内容审查结果的文件
private static string ImageOutputFile = "ImageModerationOutput.json";
在项目的根目录下新建一个文件,文件名命名为ImageFiles.txt, 同时该文件的内容为:
https://moderatorsampleimages.blob.core.windows.net/samples/sample2.jpg
https://moderatorsampleimages.blob.core.windows.net/samples/sample5.png
该文件定义了两个用于进行内容审查的文件列表。
我们已经定义好了我们需要的数据字段了,现在来定义图片审查的方法
图片审查的方法
我们从之前文本审查的方法中可以看到我们只需要将内容发送到内容审查服务的endpoint, 由内容审查服务完成审查,那么对于图片审查也是类似的,具体的请观察下午代码:
/*
* 图片审查
* 该实例中的图片从URL上读入
*/
public static void ModerateImages(ContentModeratorClient client, string urlFile, string outputFile)
{
Console.WriteLine("--------------------------------------------------------------");
Console.WriteLine();
Console.WriteLine("图片审查");
Console.WriteLine();
//创建一个List用于保存审查的结果
List<EvaluationData> evaluationData = new List<EvaluationData>();

using (client)
{
    // 从文件中读入保存图片的URL, 然后从URL读入文件
    using (StreamReader inputReader = new StreamReader(urlFile))
    {
        while (!inputReader.EndOfStream)
        {
            string line = inputReader.ReadLine().Trim();
            if (line != String.Empty)
            {
                Console.WriteLine("开始审查图片文件: {0}...", Path.GetFileName(line));
                var imageUrl = new BodyModel("URL", line.Trim());

                var imageData = new EvaluationData
                {
                    ImageUrl = imageUrl.Value,

                    // 审查图片
                    ImageModeration =
                                client.ImageModeration.EvaluateUrlInput("application/json", imageUrl, true)
                };
                Thread.Sleep(1000);

                // 检测图片中的文字,并识别文字
                imageData.TextDetection =
                    client.ImageModeration.OCRUrlInput("eng", "application/json", imageUrl, true);
                Thread.Sleep(1000);

                // 图片中的人脸检测
                imageData.FaceDetection =
                    client.ImageModeration.FindFacesUrlInput("application/json", imageUrl, true);
                Thread.Sleep(1000);

                // 将检测结果写入到imageData
                evaluationData.Add(imageData);
            }
        }
    }


    // 保存审查结果到文件
    using (StreamWriter outputWriter = new StreamWriter(outputFile, false))
    {
        outputWriter.WriteLine(JsonConvert.SerializeObject(
            evaluationData, Formatting.Indented));

        outputWriter.Flush();
        outputWriter.Close();
    }
    Console.WriteLine();
    Console.WriteLine("图片审查的结果已保存到文件: " + outputFile);
    Console.WriteLine();
}
}
观察该方法我们发现我们使用了一个帮助类EvaluationData, 我们用该类来记录图片审查结果,主要包括图片内容审查的结果,图片中文字的审查结果(通过OCR)以及图片中的人脸检测,我们也将该类的定义放在同一个文件中,同一个名称空间下
EvaluationData类定义:
//该类用于保存图片内容审查后返回的结果,包括图片中的文字以及人脸检测
public class EvaluationData
{
//原始图片的URL
public string ImageUrl;

//图片审查结果
public Evaluate ImageModeration;

//图片中文字通过OCR审查的结果
public OCR TextDetection;

//图片中人脸的检测
public FoundFaces FaceDetection;
}
在Main()方法中调用图片审查
现在我们可以在方法Main()中进行图片的审查了。我们先需要创建一个用于图片审查的客户端,然后调用图片审查的方法。
//定义一个图片审阅客户端
ContentModeratorClient clientImage = Authenticate(SubscriptionKey, Endpoint);
//审查图片内容
ModerateImages(clientImage, ImageUrlFile, ImageOutputFile);
现在你可以运行一下应用看看图片审查的结果了。
创建人工审查
这个部分是我们第三个部分需要讨论和学习的部分了,使用.Net SDK创建人工审查。
在开始之前我们先要了解什么是人工审查,为什么需要人工审查,以及人工审查和内容审查服务提供的API之间有什么关系。
首先需要理解的是Azure Content Moderator提供的内容审查服务(API/SDK)是通用的计算模型,这个模型对于很多的样例数据支持并不一定十分的完美,有时候我们需要在使用内容审查服务过滤一遍之后,还是需要人工介入再进行二次的审查,二次审查之后,通过人工标记,然后合并机器审查的内容给出最终的审查结果,这样的结果更为准确。需要注意到使用人工审查的工具审查的结果并不能帮助机器审查改进的自己的模型。
人工审查如何进行?
Azure Content Moderator服务提供了一个在线的工具Review Tools, 该工具是一个在线的网站,用户需要先从该网站中注册自己用于人工审阅的团队,获取到review tool的private endpoint和key, 然后在使用机器审查的时候,通过内容审查服务提供的SDK,向review tools发送需要人工审查的内容,同时SDK会获取人工审查的结果,并合并结果,保存,这是一般的过程。为了完成这部分内容,我们先需要在review tools的Portal上注册自己的团队。
注册和登录review tool
注册和登录review tool请访问如下的URL Review tool, 打开之后,点击Sigin in, 可以考虑直接使用Microsoft account登录。登录之后,需要选择你想注册和登录的区域,如下图:
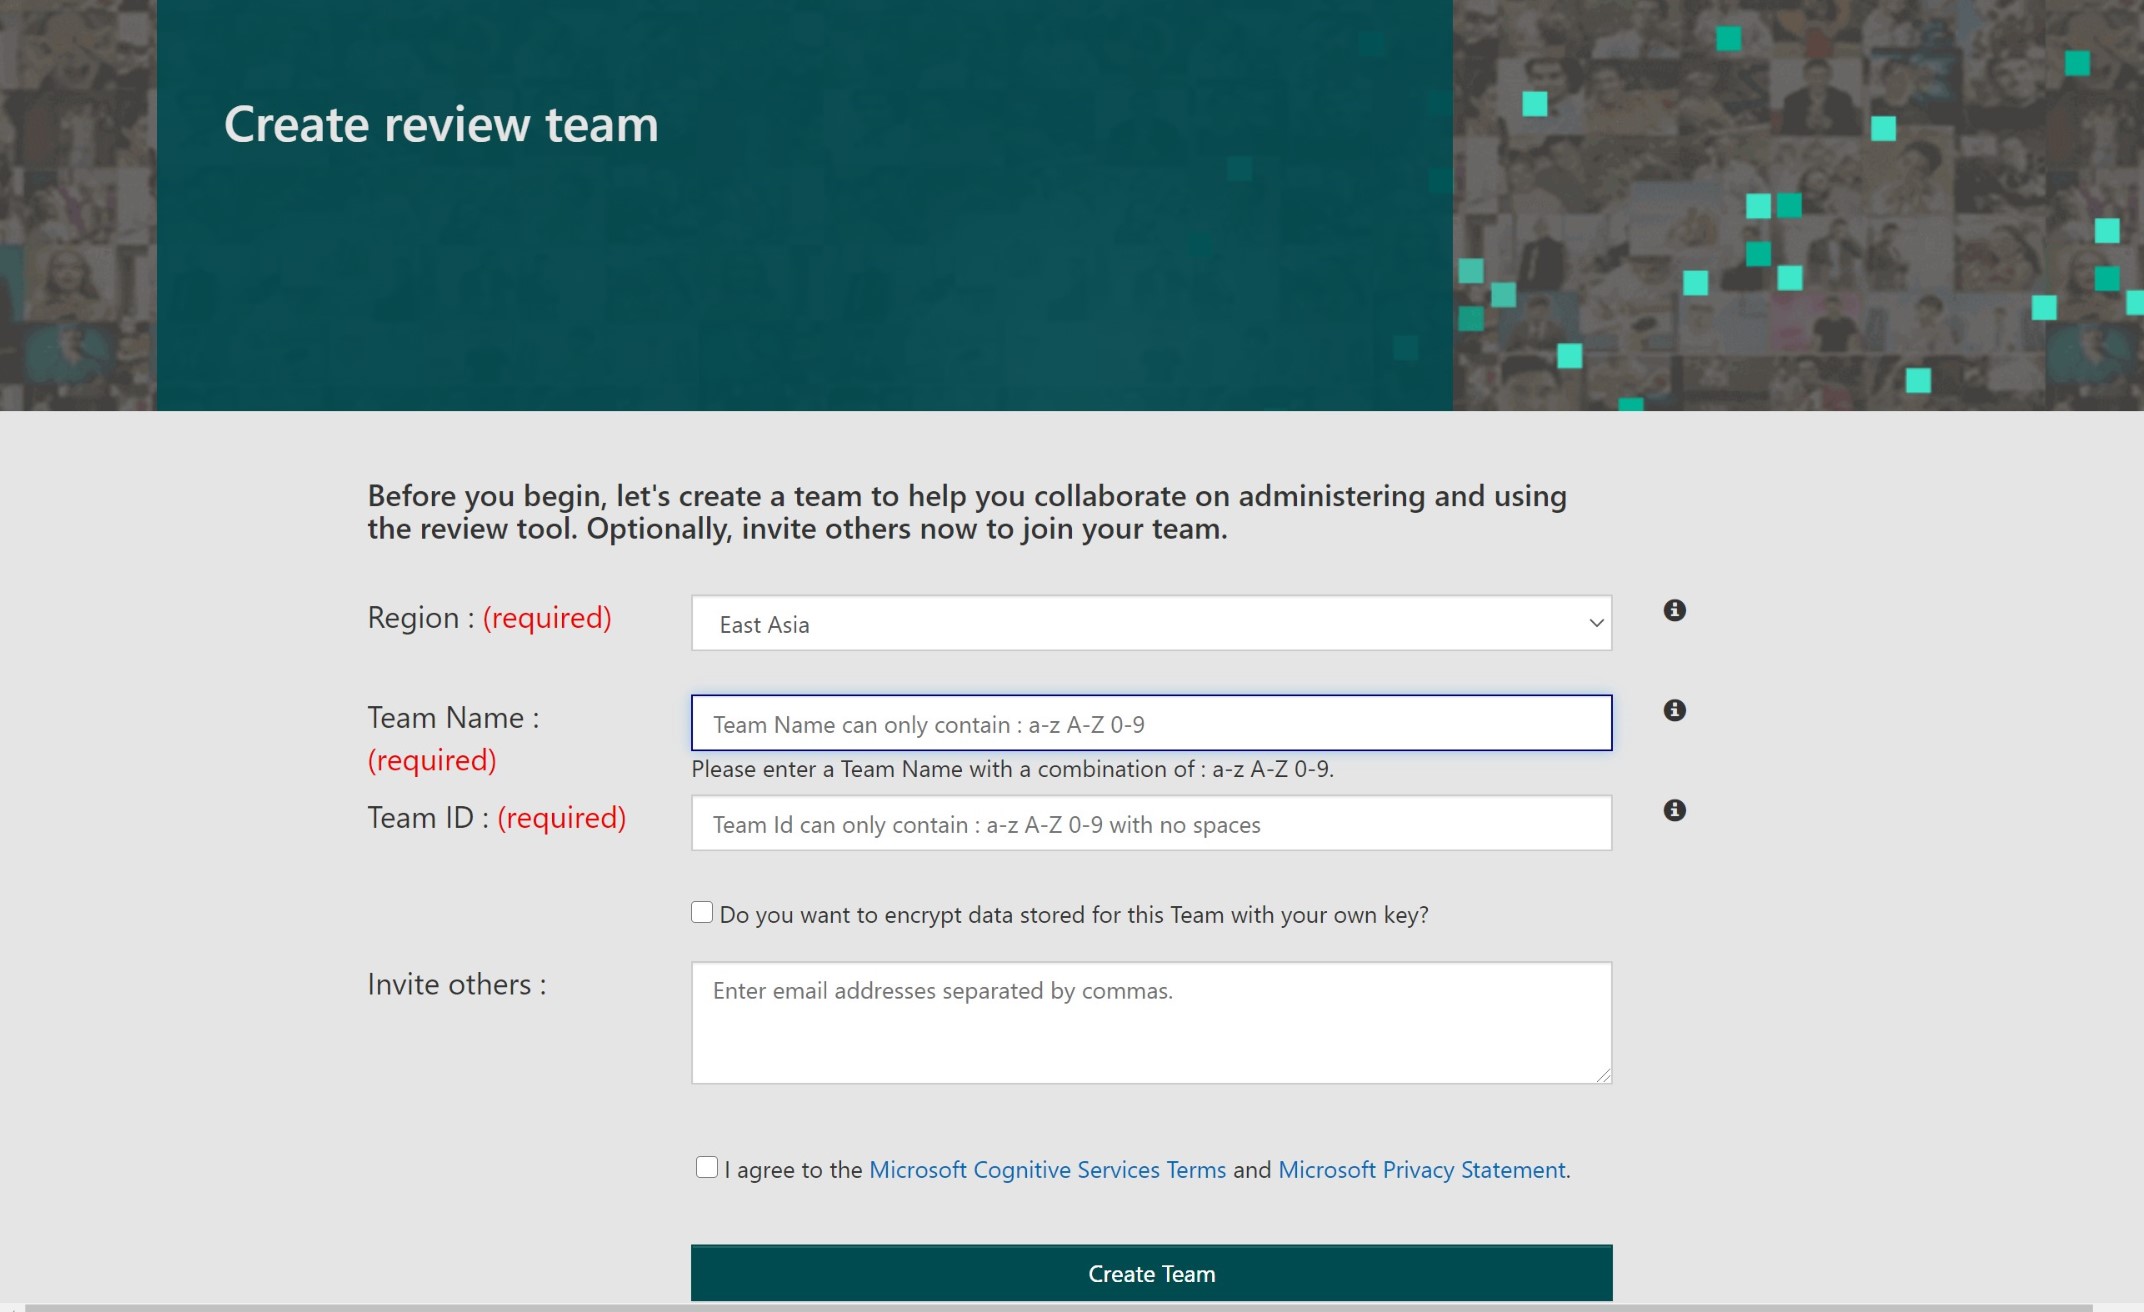
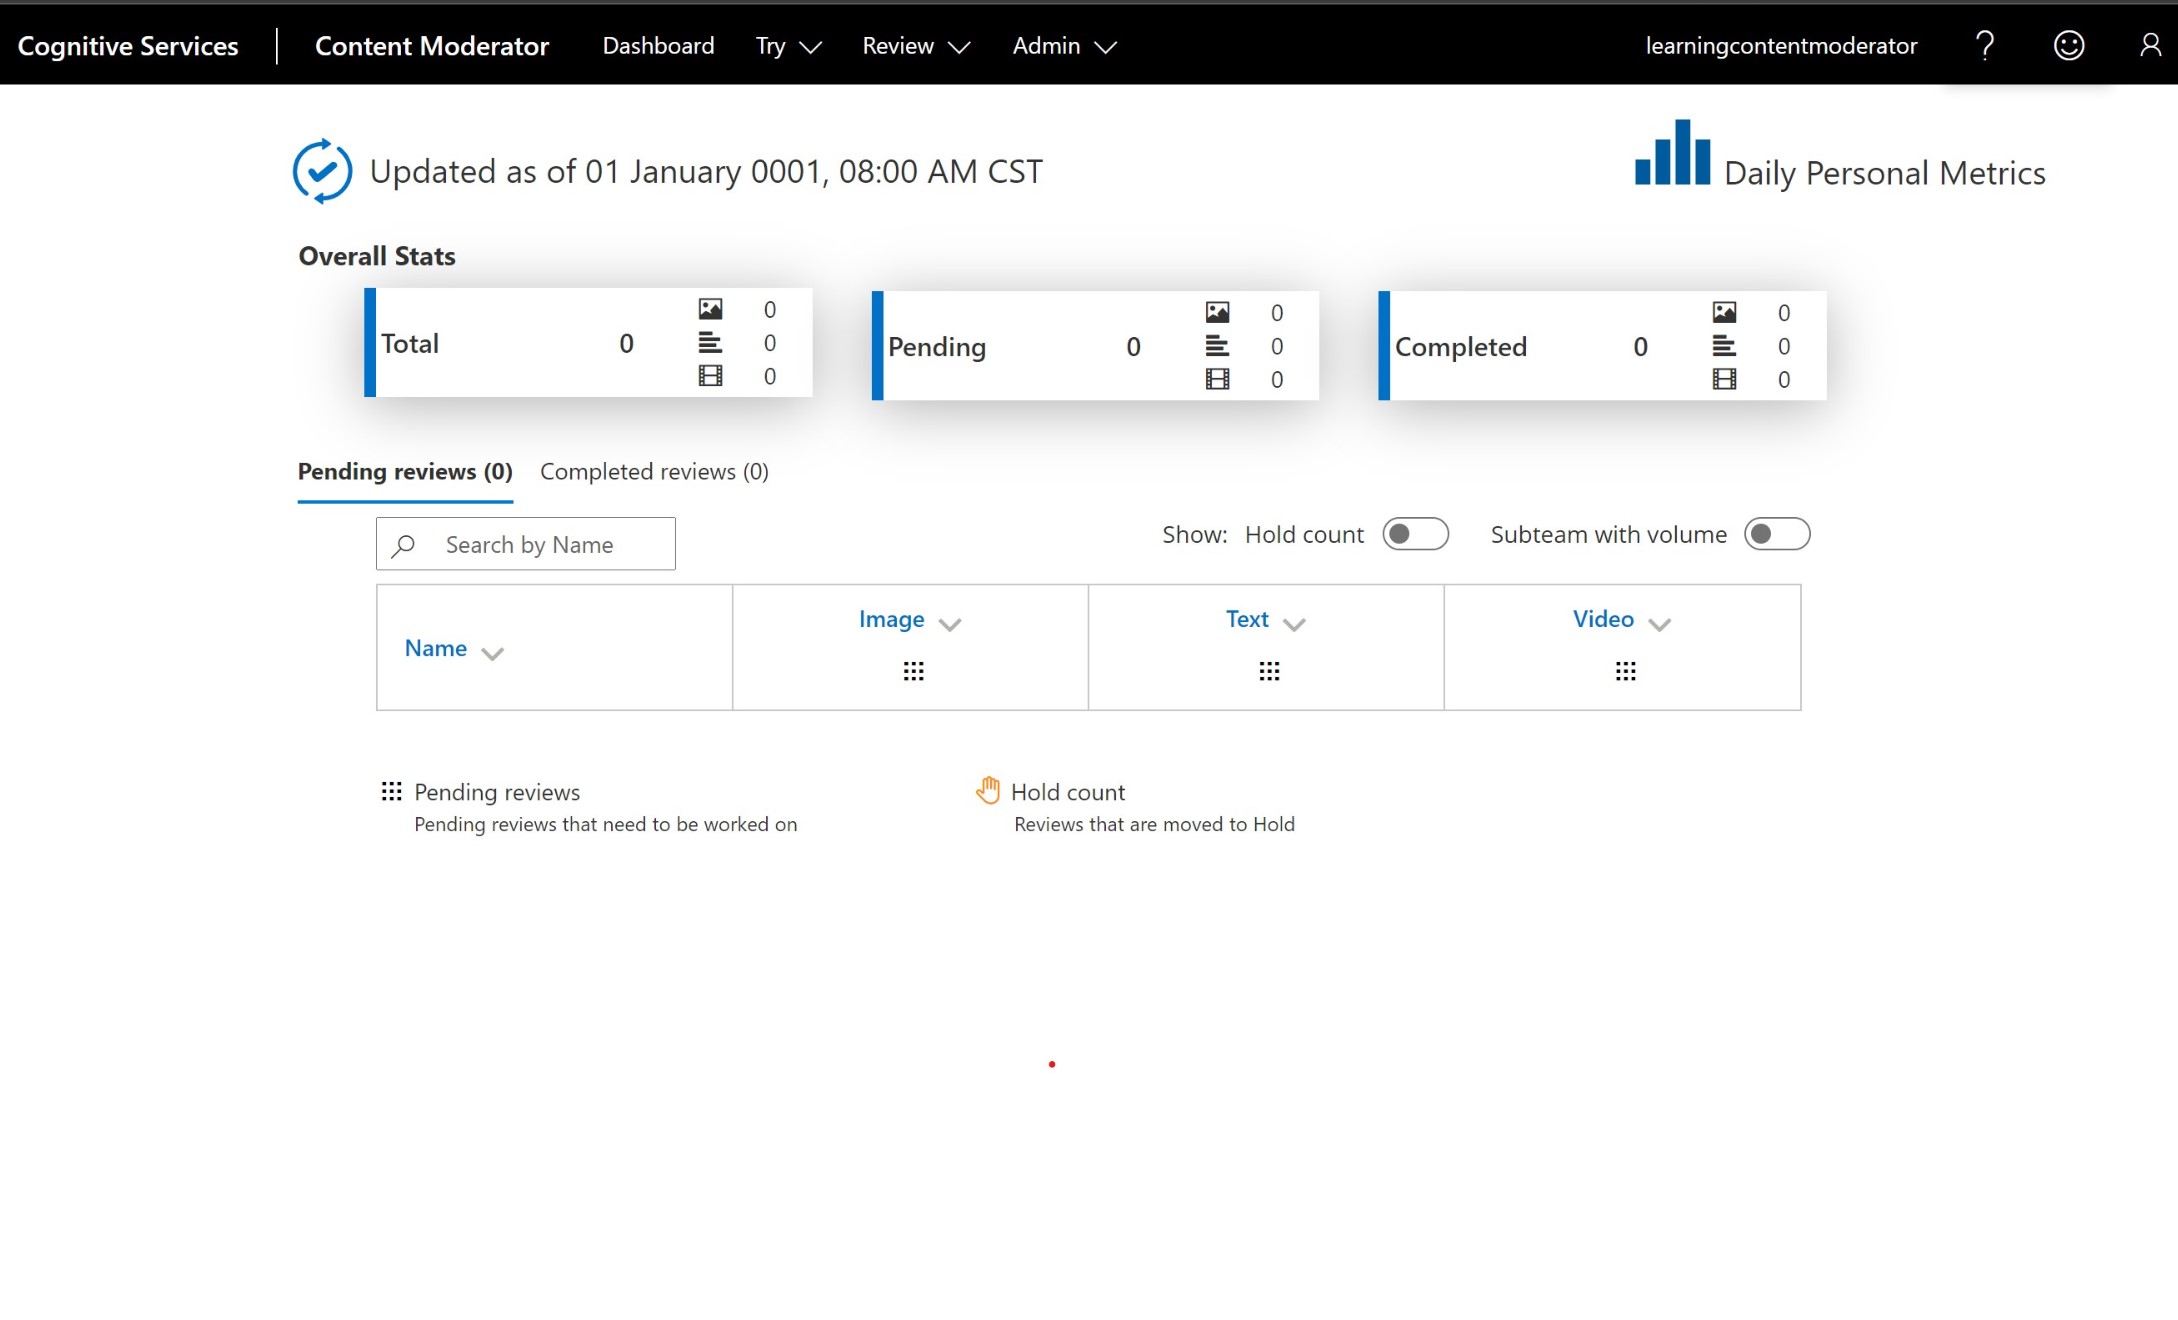
按照提示填写必要的信息,点击Create即可以创建自己的team了。创建成功后,可以进入到review tool的首页。如下图:
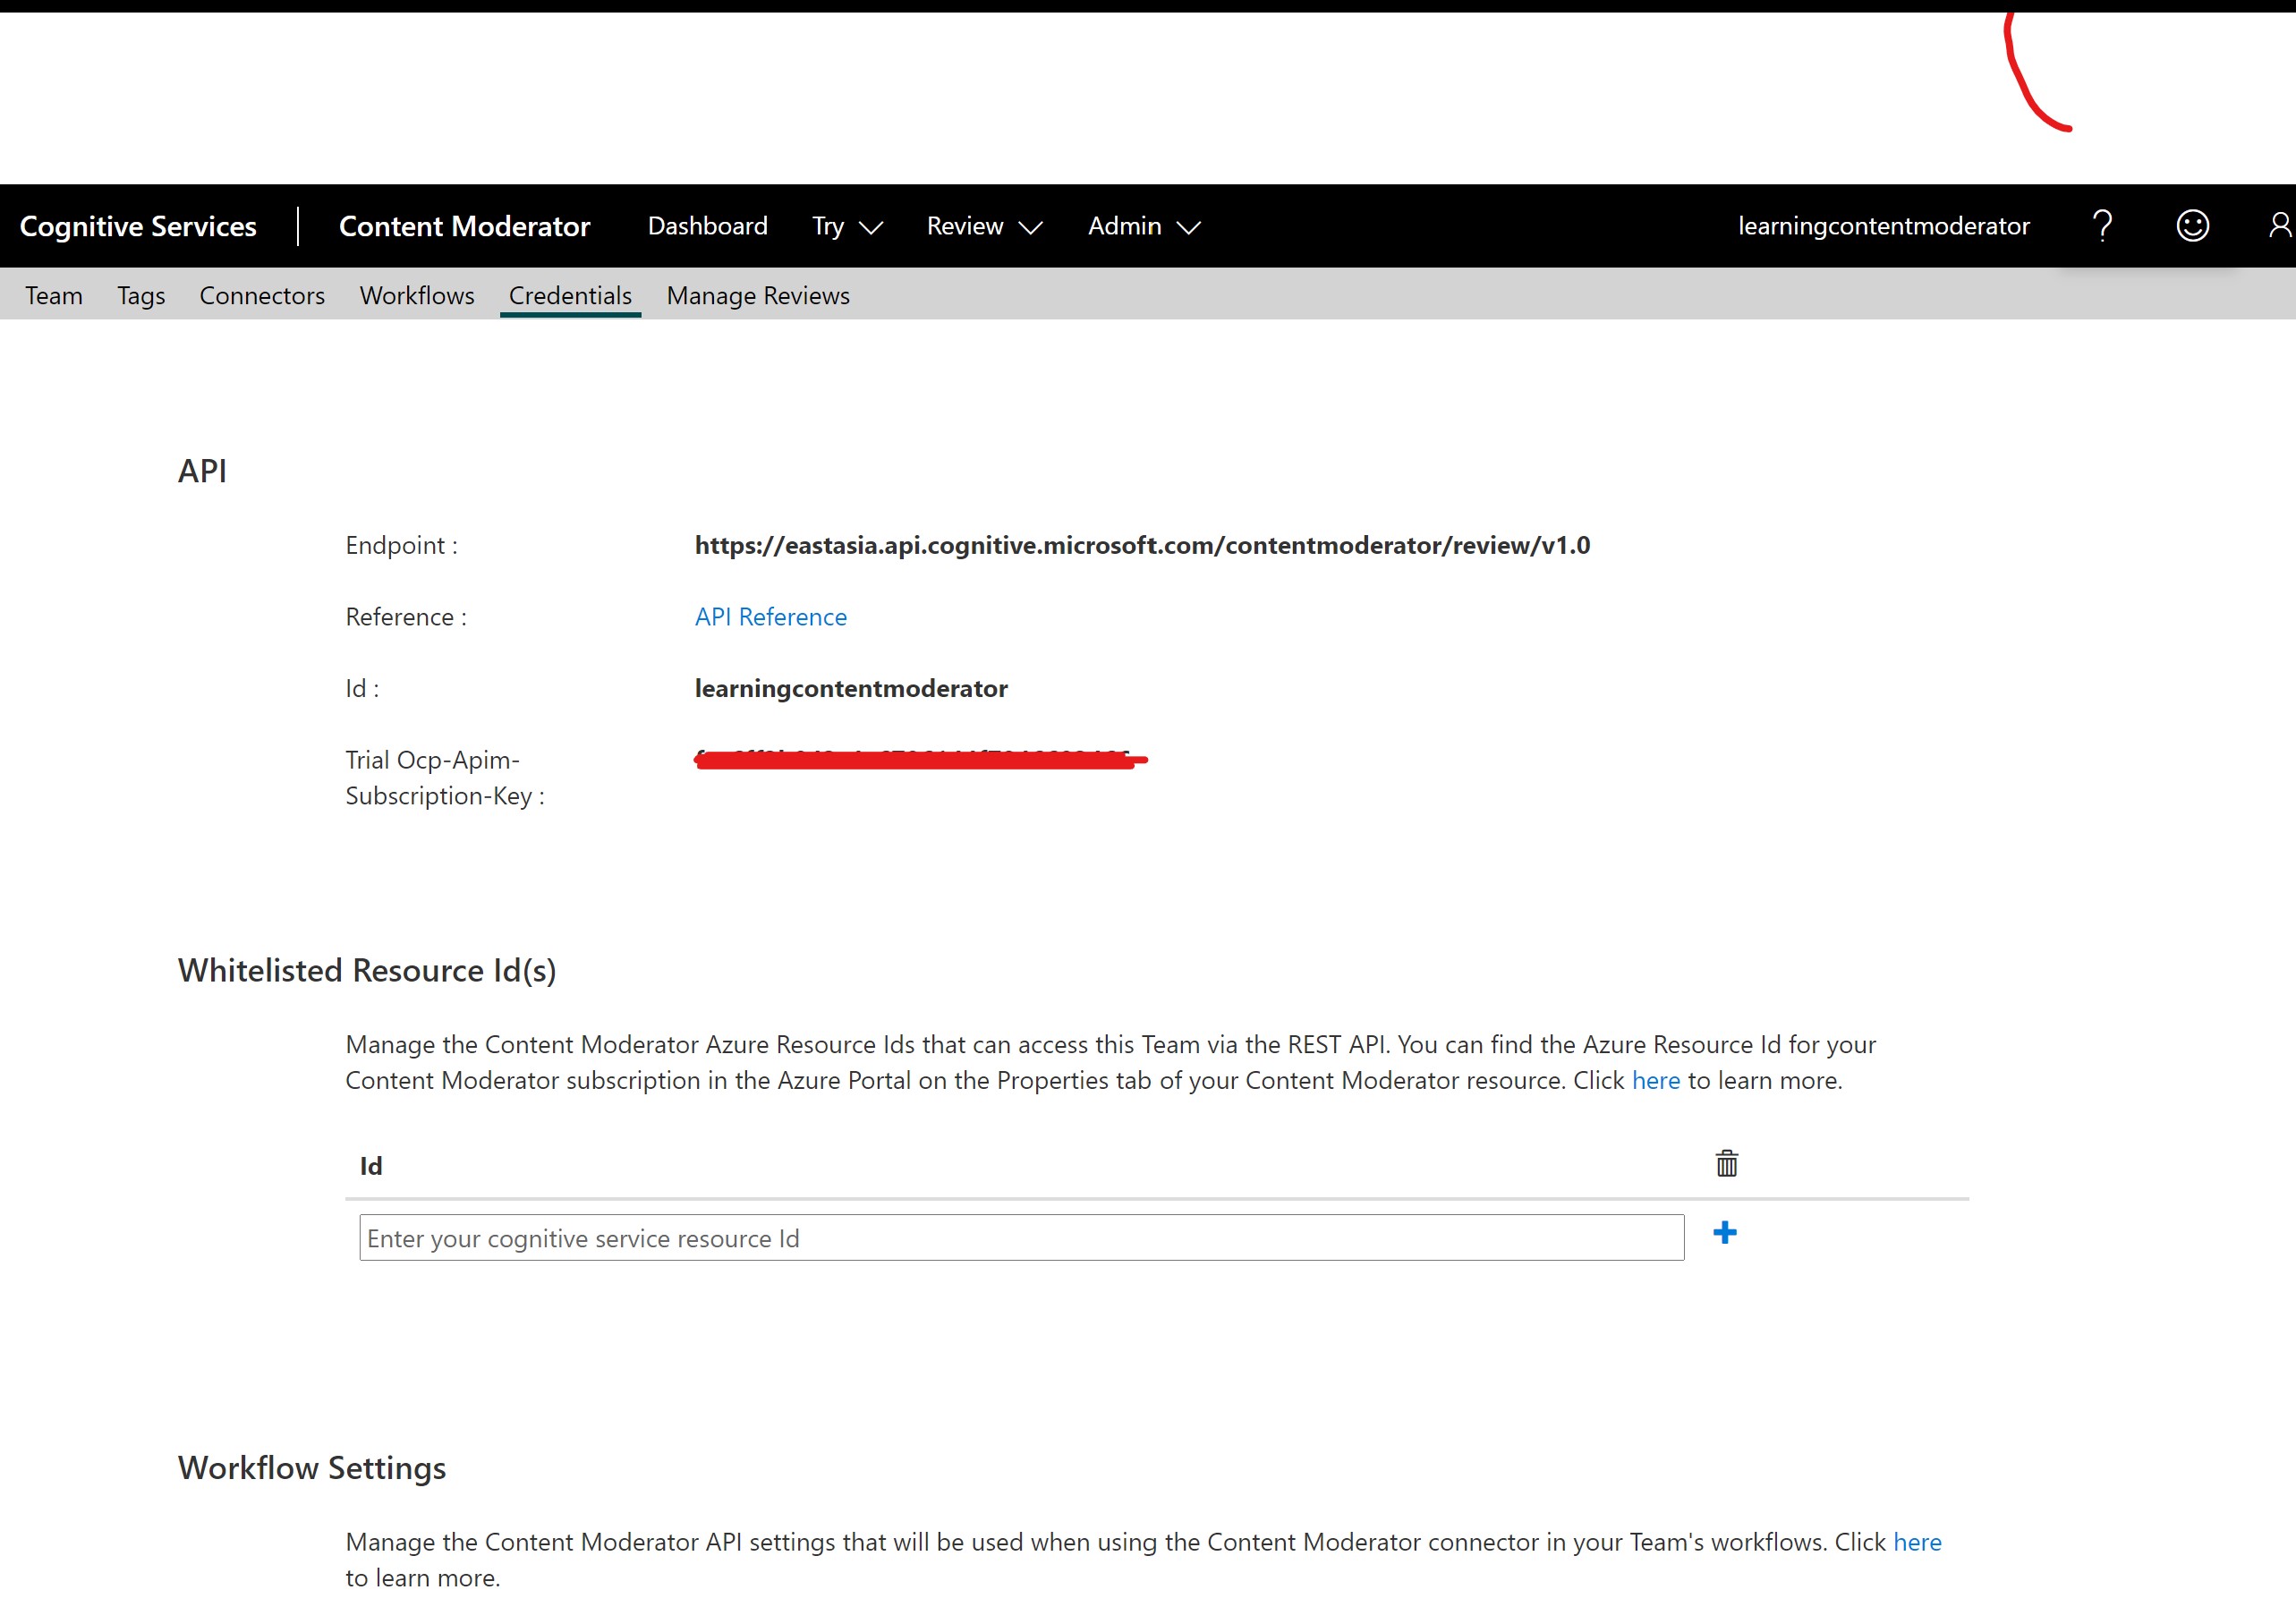
进入了首页之后我们需要取得访问review tool的认证资料,可以从首页的菜单admin->Credentials, 如下图你可以找到需要从sdk 的客户端中存取review tool的信息:
拿到这些信息之后,我们就可以开始我们第三部分的代码了。前面我们已经详细的讨论过了,为什么需要人工审阅,以及SDK如何和人工审阅进行通讯,那么下面我们来实现它就可以了。
首先我们需要定义review tool的基本信息,主要是你定义的team名字和你的私有的endpoint, 如下图所示:
private static readonly string TEAM_NAME = "learningcontentmoderator";
// The callback endpoint for completed human reviews.
// For example: https://westus.api.cognitive.microsoft.com/contentmoderator/review/v1.0
// As reviewers complete reviews, results are sent using an HTTP POST request.
private static readonly string ReviewsEndpoint = "https://eastasia.api.cognitive.microsoft.com/contentmoderator/review/v1.0";
然后定义一个类用于描述人工审阅之后的结果集
 // Associates the review ID (assigned by the service) to the internal.
public class ReviewItem
{
// The media type for the item to review.
public string Type;
// The URL of the item to review.
public string Url;
// The internal content ID for the item to review.
public string ContentId;
// The ID that the service assigned to the review.
public string ReviewId;

}
最后我们来通过内容审阅SDK来定义一个创建人工审阅的方法:
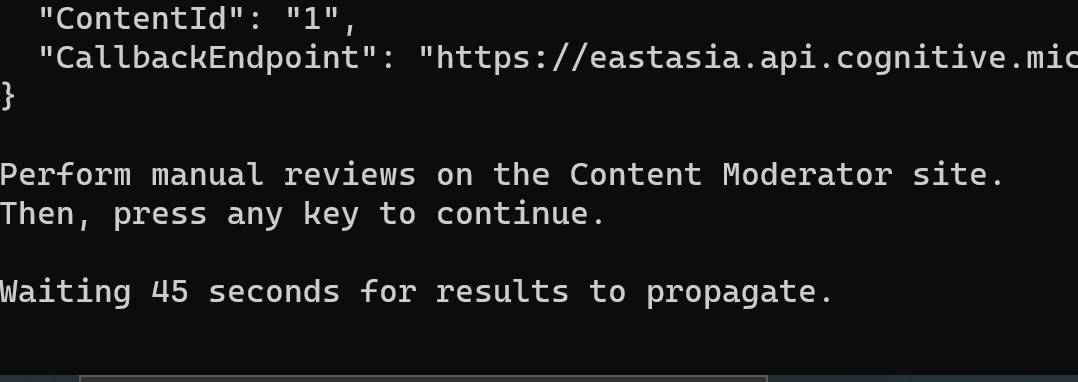
        // 使用.Net Client创建一个review 工具, 用于在使用内容审查服务审查结束后,再使用人工审查的工具核验并人工审查
        private static void CreateReviews(ContentModeratorClient client, string[] ImageUrls, string teamName, string endpoint)
        {
            Console.WriteLine("--------------------------------------------------------------");
            Console.WriteLine();
            Console.WriteLine("创建人工审阅");

            //设定在调用图片API之间等待得最小事件,单位毫秒
            const int throttleRate = 2000;
            //定义在一个审阅完成之后需要等待多少秒
            const int latencyDelay = 45;

            //定义输出的日志文件
            const string OutputFile = "OutputLog.txt";

            //定义需要审阅的媒体类型,可以定义为"image", "text", "video" 三种类型。
            const string MediaType = "image";

            //定义一个审阅项的元数据,'score'的缩写,定义这个值,会给人工审阅的时候,在审阅项上给人工一个'a'(Adult, 成人), 'r'(Racy, 色情)两个选项。
            //同时配合MetadataValue为true 表示该人工审阅的项值,例如Adult = true, 类似这样的
            const string MetadataKey = "sc";
            // The metadata value to initially add to each review item.
            const string MetadataValue = "true";

            // A static reference to the text writer to use for logging.
            TextWriter writer;

            // The cached review information, associating a local content ID to the created review ID for each item.
            List<ReviewItem> reviewItems = new List<ReviewItem>();

            using (TextWriter outputWriter = new StreamWriter(OutputFile, false))
            {
                writer = outputWriter;
                WriteLine(writer, null, true);
                WriteLine(writer, "Creating reviews for the following images:", true);

                // Create the structure to hold the request body information.
                List<CreateReviewBodyItem> requestInfo = new List<CreateReviewBodyItem>();

                // Create some standard metadata to add to each item.
                List<CreateReviewBodyItemMetadataItem> metadata =
                    new List<CreateReviewBodyItemMetadataItem>(new CreateReviewBodyItemMetadataItem[]
                    { new CreateReviewBodyItemMetadataItem(MetadataKey, MetadataValue) });

                // Populate the request body information and the initial cached review information.
                for (int i = 0; i < ImageUrls.Length; i++)
                {
                    // Cache the local information with which to create the review.
                    var itemInfo = new ReviewItem()
                    {
                        Type = MediaType,
                        ContentId = i.ToString(),
                        Url = ImageUrls[i],
                        ReviewId = null
                    };

                    WriteLine(writer, $" {Path.GetFileName(itemInfo.Url)} with id = {itemInfo.ContentId}.", true);

                    // Add the item informaton to the request information.
                    requestInfo.Add(new CreateReviewBodyItem(itemInfo.Type, itemInfo.Url, itemInfo.ContentId, endpoint, metadata));

                    // Cache the review creation information.
                    reviewItems.Add(itemInfo);
                }

                var reviewResponse = client.Reviews.CreateReviewsWithHttpMessagesAsync("application/json", teamName, requestInfo);


                // Update the local cache to associate the created review IDs with the associated content.
                var reviewIds = reviewResponse.Result.Body;
                for (int i = 0; i < reviewIds.Count; i++) { reviewItems[i].ReviewId = reviewIds[i]; }

                WriteLine(outputWriter, JsonConvert.SerializeObject(reviewIds, Formatting.Indented));
                Thread.Sleep(throttleRate);

                // Get details of the reviews created that were sent to the Content Moderator website.
                WriteLine(outputWriter, null, true);
                WriteLine(outputWriter, "Getting review details:", true);
                foreach (var item in reviewItems)
                {
                    var reviewDetail = client.Reviews.GetReviewWithHttpMessagesAsync(teamName, item.ReviewId);
                    WriteLine(outputWriter, $"Review {item.ReviewId} for item ID {item.ContentId} is " +
                        $"{reviewDetail.Result.Body.Status}.", true);
                    WriteLine(outputWriter, JsonConvert.SerializeObject(reviewDetail.Result.Body, Formatting.Indented));
                    Thread.Sleep(throttleRate);
                }

                Console.WriteLine();
                Console.WriteLine("Perform manual reviews on the Content Moderator site.");
                Console.WriteLine("Then, press any key to continue.");
                Console.ReadKey();

                // After the human reviews, the results are confirmed.
                Console.WriteLine();
                Console.WriteLine($"Waiting {latencyDelay} seconds for results to propagate.");
                Thread.Sleep(latencyDelay * 1000);

                // Get details from the human review.
                WriteLine(writer, null, true);
                WriteLine(writer, "Getting review details:", true);
                foreach (var item in reviewItems)
                {
                    var reviewDetail = client.Reviews.GetReviewWithHttpMessagesAsync(teamName, item.ReviewId);
                    WriteLine(writer, $"Review {item.ReviewId} for item ID {item.ContentId} is " + $"{reviewDetail.Result.Body.Status}.", true);
                    WriteLine(outputWriter, JsonConvert.SerializeObject(reviewDetail.Result.Body, Formatting.Indented));

                    Thread.Sleep(throttleRate);
                }

                Console.WriteLine();
                Console.WriteLine("Check the OutputLog.txt file for results of the review.");

                writer = null;
                outputWriter.Flush();
                outputWriter.Close();
            }
            Console.WriteLine("--------------------------------------------------------------");
        }
同时我们顶一个帮助方法,用于输出日志:
private static void WriteLine(TextWriter writer, string message = null, bool echo = true)
{
writer.WriteLine(message ?? String.Empty);
if (echo) { Console.WriteLine(message ?? String.Empty); }
}
至此我们定义好了所有的必须的方法,那么我们再次尝试运行一边该应用:
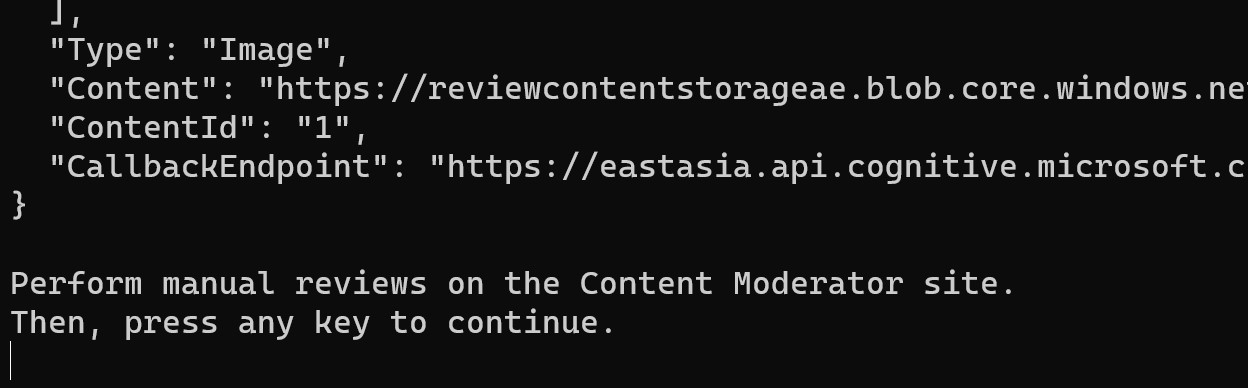
我们可以看到我们使用SDK向review tool要求人工审阅的项,上传完成了之后,会提示如下的信息,要求进行人工审阅,并等待人工审阅的结果:
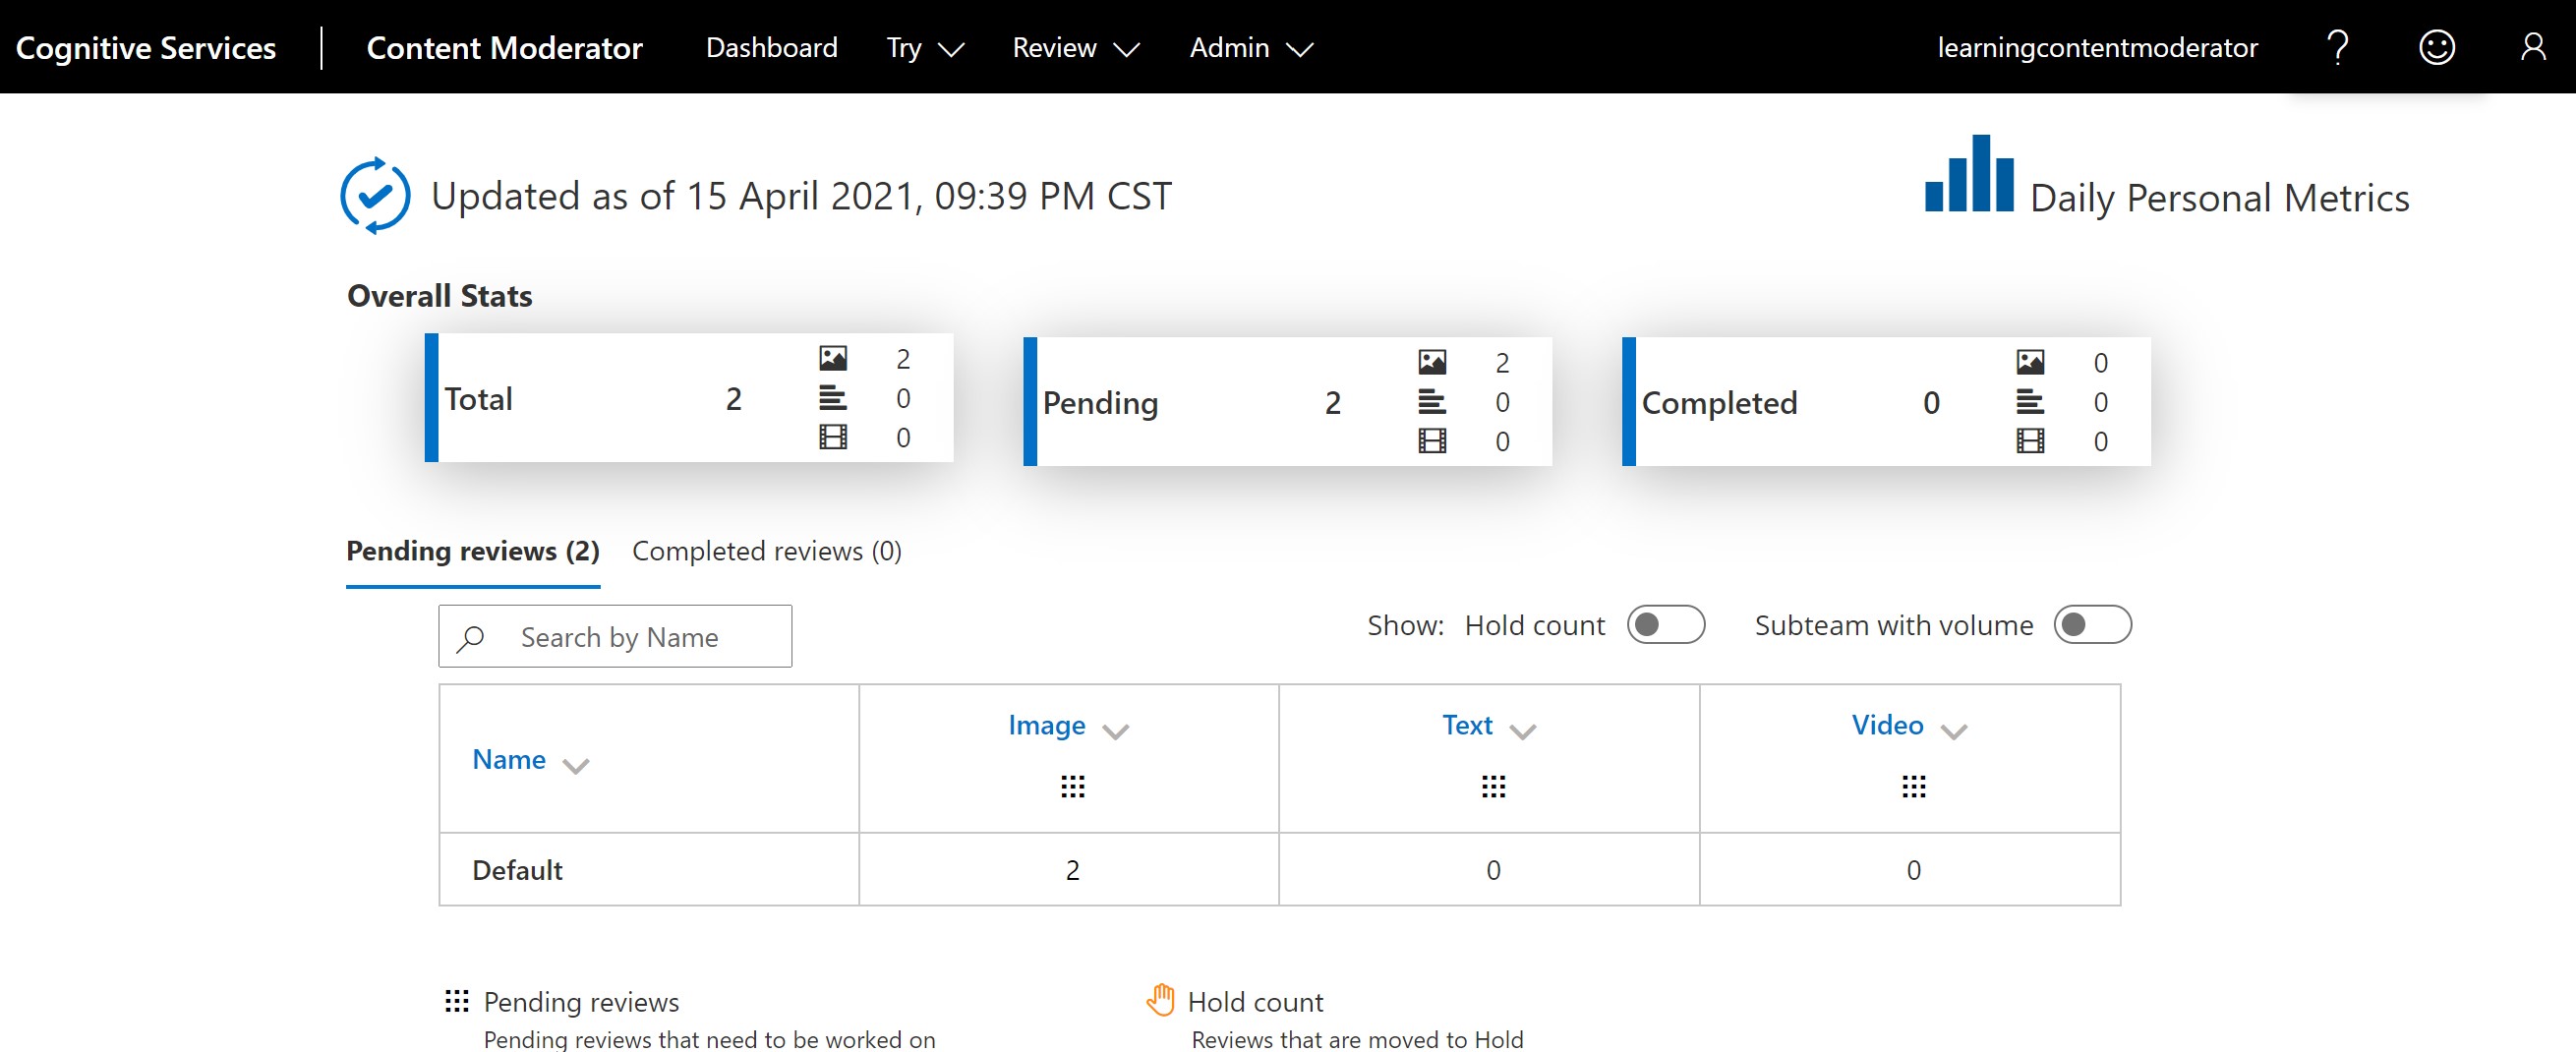
这个时候我们打开review tool并等到dashboard, 可以看到我们有两个pendding的需要人工审阅的图像:
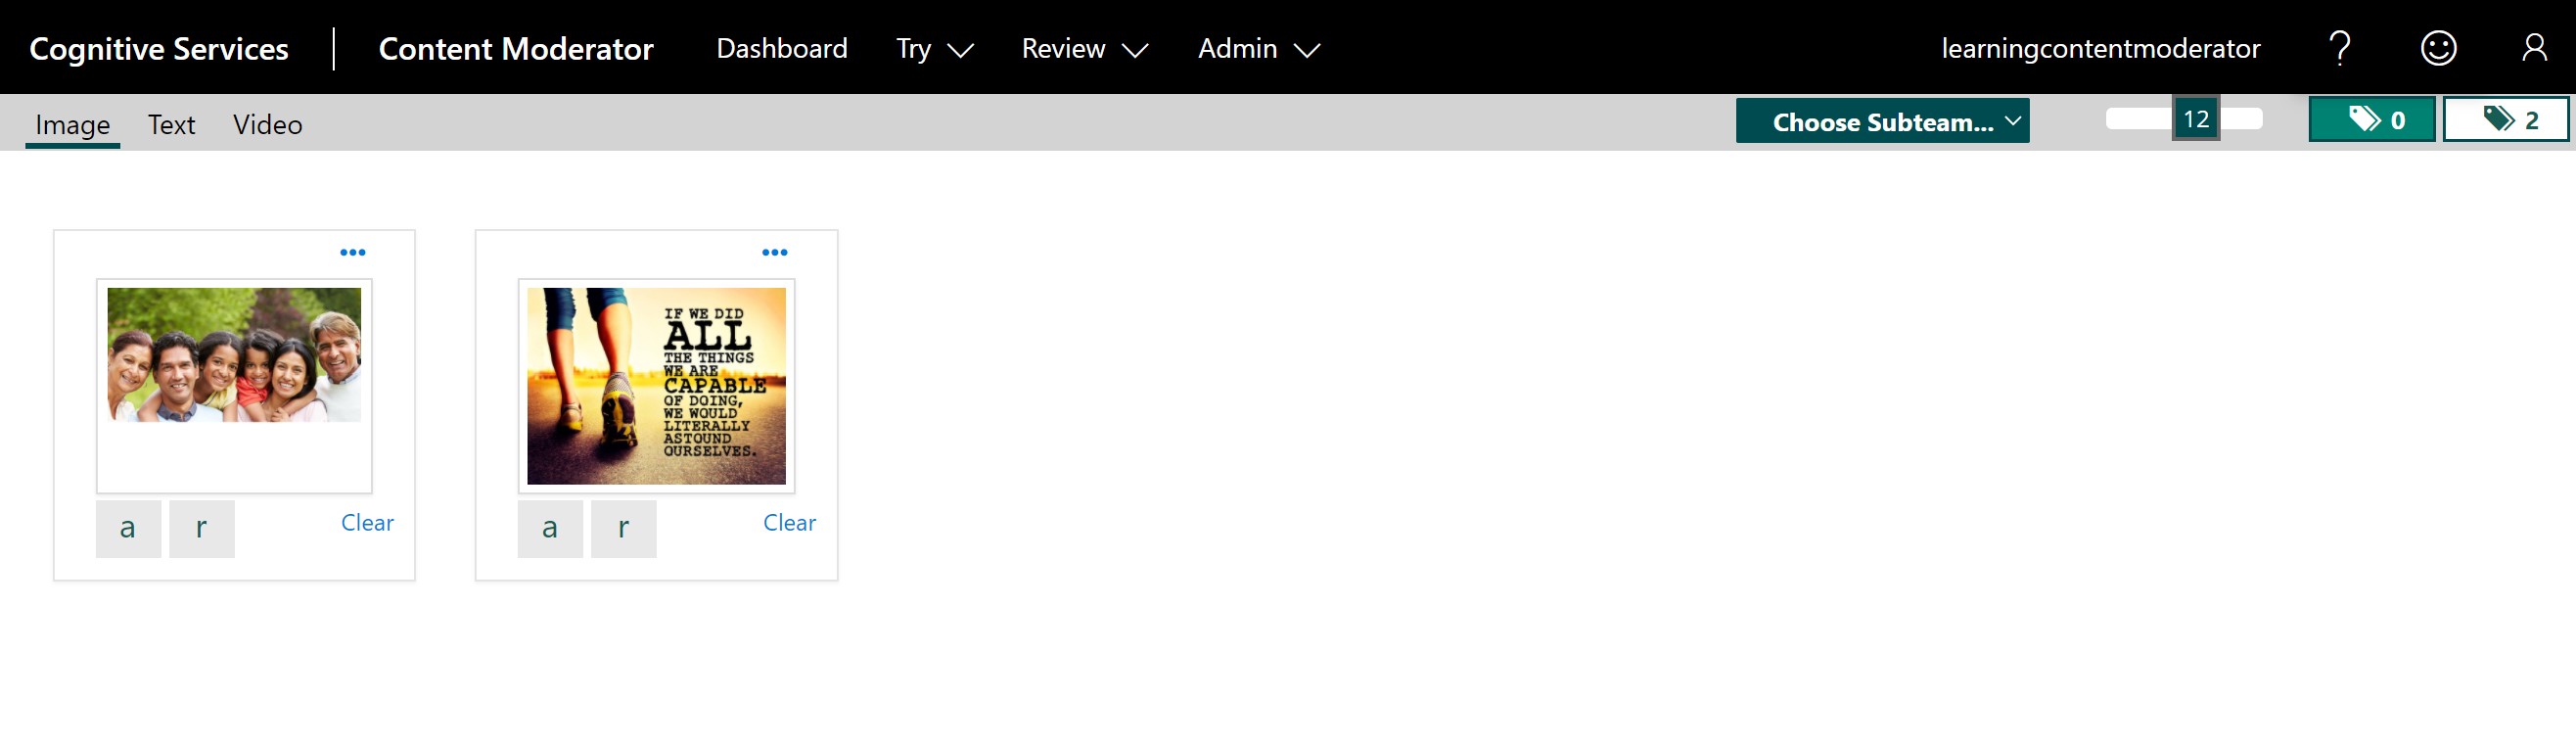
我们选择菜单review, 即可以显示如下的图像:
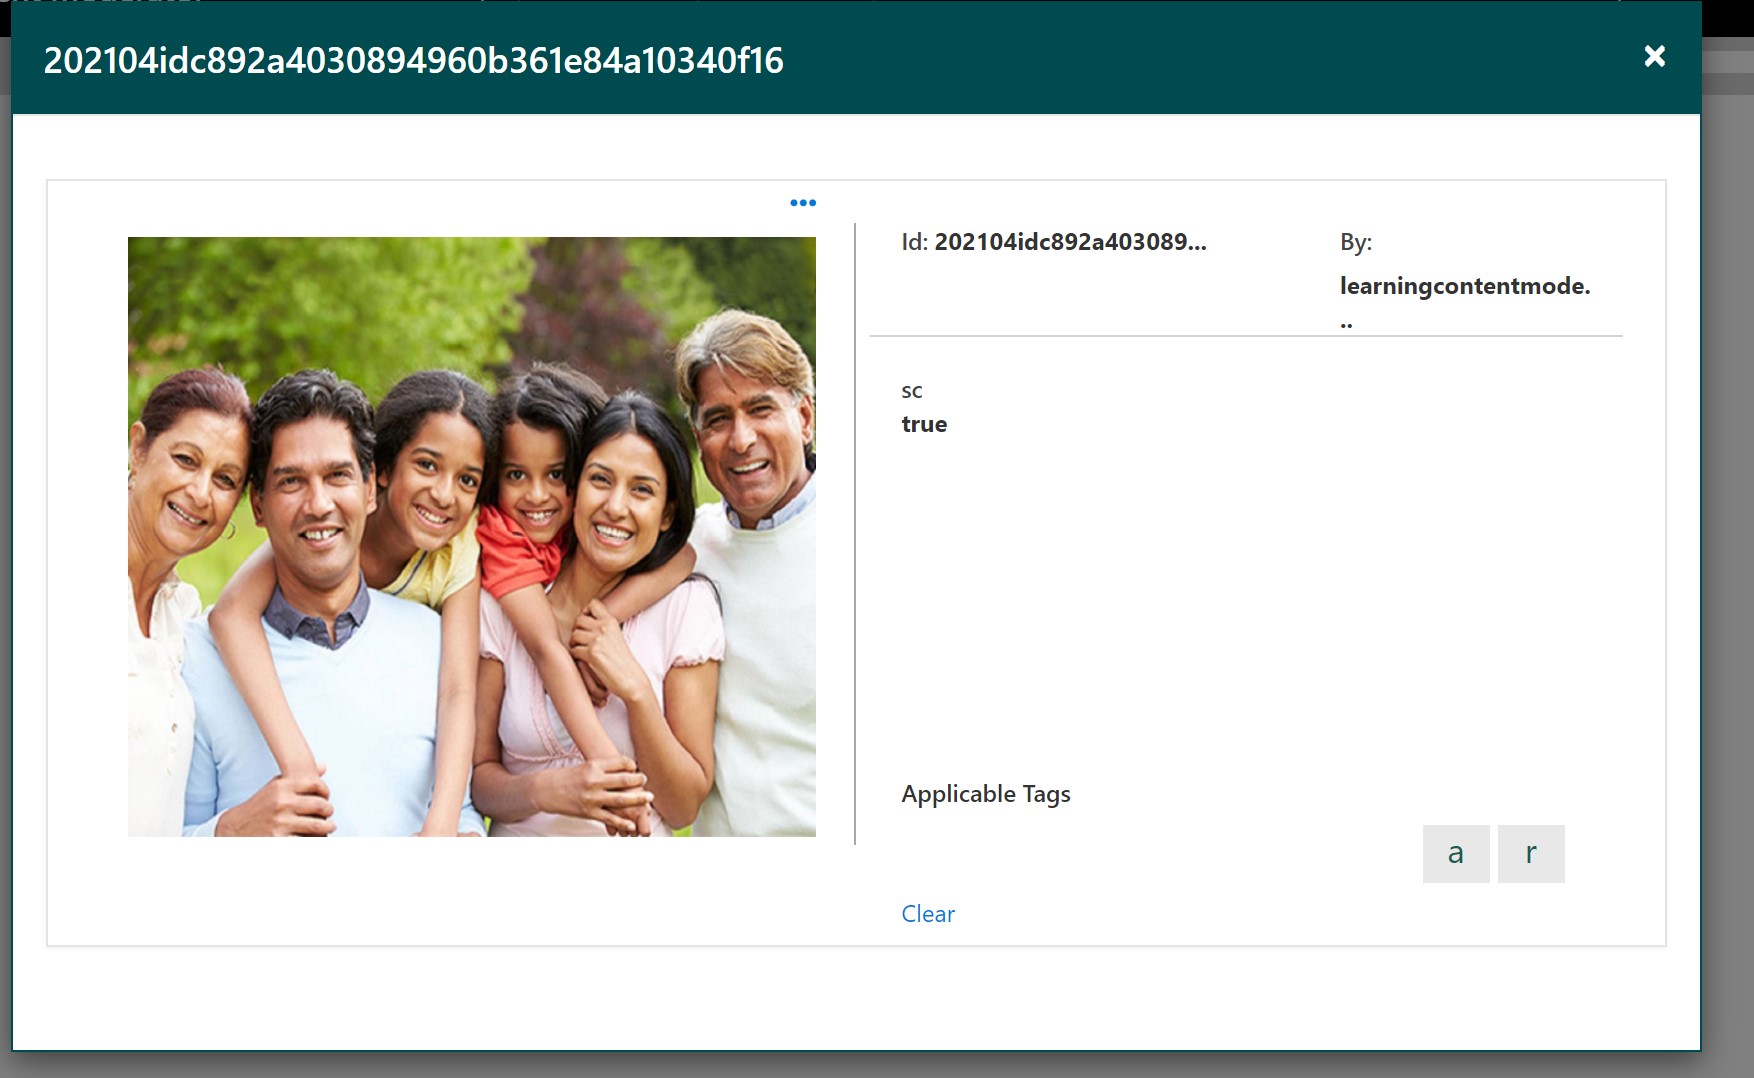
点击其中一个图像,即显示需要review的详细
选择review结束后,返回控制台应用,即得到了使用内容审查API并结合了人工审阅合并结果,并保存到我们需要的文件。
至此我们已经将内容审查的入门全部讲完了,我们讲述了文本审查,图片审查,以及结合人工审查的基本流程,希望能够帮助到大家。